
Estimated reading time: 18 minutes
In the age of smart homes and intelligent devices, there’s nothing more exciting than having a Wi-Fi-controlled robot car at your fingertips. NodeMcu technology has made this dream a reality, allowing us to control a robot car from our smartphones easily. The Wi-Fi Controlled Robot Car using NodeMcu is a fantastic example of how technology can make our lives easier and more enjoyable.
The Wi-Fi Controlled Robot Car is an excellent tool for learning about robotics and automation. It's a fun way to start with NodeMcu technology and explore its possibilities.
A Convenient and Affordable Technology
NodeMcu is an open-source firmware and development kit based on the ESP8266 Wi-Fi module. It has become trendy among developers and makers due to its ease of use and affordable price. The built-in Wi-Fi module allows easy connectivity with our smartphones, enabling us to control the robot car remotely.
The range of the NodeMcu technology is also impressive, with the ability to operate up to 1km. This means we can control our robot car from a considerable distance without worrying about connectivity issues.
“Wi-fi Controlled Robot car Using NodeMcu “
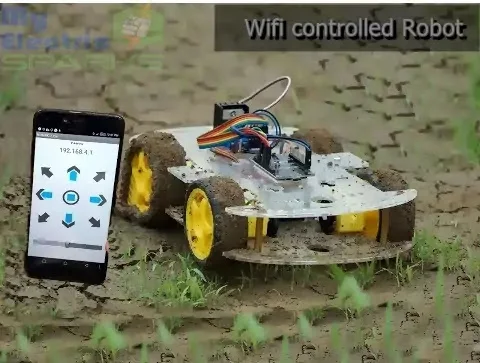
The Wi-Fi Controlled Robot Car using NodeMcu is controlled from a smartphone through Wi-Fi as Nodemcu has built-in Wi-Fi that can easily connect with our smartphone and control the Robot using Wi-Fi. NodeMcu has a high range and can work almost up to 1km. This is affordable as well as easy to use.
The Wi-Fi Controlled Robot Car using NodeMcu is a fantastic device showing off NodeMcu technology’s power. It’s affordable, easy to use, and provides much entertainment for people of all ages.
How does it work?
The Wi-Fi Controlled Robot Car using NodeMcu comprises a few different parts. It would be best to have a robot car kit, a NodeMcu development board, a motor driver module, a battery, and a Wi-Fi-enabled smartphone.
Once you’ve assembled the robot car and connected the NodeMcu to the motor driver module and battery, you can download and upload the Wi-Fi Controlled Robot Car code. This code allows you to control the robot car from your smartphone using an app that connects to the NodeMcu.
Suggestions: Automatic Home Cleaning Robot with the help of Arduino
Components Required for Wi-fi Control Robot Car:
Let’s look at the components you’ll need to get started.
NodeMcu: Firstly, you’ll need a NodeMcu development board. This board is the brain of your robot car and allows you to control it wirelessly using Wi-Fi. You can easily buy this online from websites like Amazon or eBay.
DC Motors: Next, you’ll need two DC motors. These motors provide the power to move your robot car. You can buy these motors online or from an electronics store.
Acrylic Sheets: You’ll need acrylic sheets to give your robot car a sturdy structure. You can cut these sheets to the size you need using a saw or a laser cutter. You can find acrylic sheets online or at a hardware store.
Wheels: Your robot car needs wheels to move around. You can buy wheels online or from a hobby store. Make sure the wheels are compatible with your DC motors.
Motor Shield L298: Lastly, you’ll need a motor shield L298. This shield controls your DC motors’ power supply and ensures they run smoothly. You can buy this shield online or from an electronics store.
You’ll need all above mentioned components to build a Wi-Fi Controlled Robot Car using NodeMcu. You can easily buy them online or from a link below.
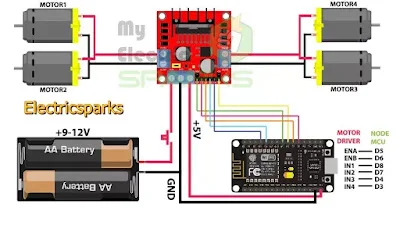
Circuit Diagram:
If you’re new to building a Wi-Fi Controlled Robot Car, it can be tough to know where to start. One important part of the process is wiring up the circuit correctly. Luckily, there’s a diagram to help you out!
The circuit diagram is a visual guide that shows you how to connect all the different components of your robot car. This includes the NodeMcu, DC motors, acrylic sheets, wheels, and motor shield L298.
To wire up the circuit, all you have to do is follow the diagram step by step. Make sure you have all the necessary components and tools before you begin. You can find the circuit diagram online or in the instructions with your robot car kit.
Wiring up the circuit is essential to building a Wi-Fi Controlled Robot Car. Follow the diagram carefully and take your time to ensure that everything is connected properly. With some patience and practice, you’ll soon be easily controlling your robot car!
Suggestion: Corona Virus Live Updater Using Arduino
Working of Wi-Fi Control Robot Car:
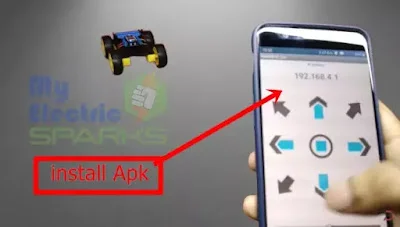
After you’ve got all the components of your Wi-Fi Controlled Robot Car and have wired up the circuit correctly. Now it’s time to get it up and running! The first step is to find the IP address of your NodeMcu board. Don’t worry; it’s not as complicated as it sounds! You can easily find the IP address through a quick Google search. However, if you need help, feel free to ask for help in the comments section
Once you’ve found the IP address, it’s time to install the APK (Android Package Kit) of the Wi-Fi Controlled Robot on your smartphone. This app allows you to control your robot car wirelessly using Wi-Fi. Make sure to set the IP address correctly in the app to connect to your NodeMcu board.
Before controlling your robot car using the app, you must upload the code to your NodeMcu board. The step-by-step procedure is given below:
- Download and install the Arduino IDE software on your computer.
- Connect your NodeMcu board to your computer using a USB cable.
- Open the Arduino IDE software and select the correct board and port from the Tools menu.
- Please copy the Wi-Fi Controlled Robot code from the instructions and paste it into the Arduino IDE software.
- Verify and upload the code to your NodeMcu board.
Once the code is uploaded, you can control your robot car using the app! Open the app and use the on-screen buttons to move the robot car in different directions.
Step By Step Procedure:
Cutting and drilling the acrylic sheet
To start, measure and mark the acrylic sheet to the desired size of your robot. You can use a ruler and a marker to make precise measurements and lines. Next, you’ll need to cut the acrylic sheet. This can be done using a saw, a laser cutter, or a specialized acrylic cutting tool. Make sure to wear protective gear like gloves and eye goggles to prevent any injuries.

Once you’ve cut the acrylic sheet to the correct size, it’s time to drill holes for the motors and other components to be attached. This can be done using a drill and a set of drill bits. Make sure to drill the holes correctly according to your circuit diagram and the placement of your motors and other components. You can use clamps or tape to hold the acrylic sheet while drilling.
Attach DC Motor
Start by arranging the motors in the desired positions according to your circuit diagram and the placement of the wheels. You can use tape or clamps to hold the motors in place while attaching them to the sheet.

Attaching the DC motors is essential in building your Wi-Fi Controlled Robot Car. With a bit of patience and attention to detail, you’ll soon be on your way to creating a fully functional robot car that can be controlled using Wi-Fi from your smartphone
Soldering dc motor
Start by stripping the insulation from the ends of the motor wires using wire strippers or a knife. Then, twist the exposed wires together.
Next, heat your soldering iron and apply a small amount of solder to the twisted wires. Be careful not to overheat the wires or apply too much solder, which can damage the motor.

Soldering all four dc motors
When soldering the motors, it’s important to do so precisely and carefully. Make sure to strip the insulation from the ends of the motor wires and twist them together before applying the solder. This will help ensure a secure connection.

It’s important to solder all of the motors similarly, according to your circuit diagram. This will help ensure that the motors work together correctly and that your robot car moves smoothly and efficiently.
Glue here for motors
Next, attach the motors to the acrylic sheet using a strong adhesive such as super glue or epoxy. Make sure to align the motors properly and hold them in place until the adhesive dries. This will help ensure the motors are securely attached and won’t lose during use.

By gluing the motors to the acrylic sheet, you’ll increase the efficiency of your robot and prevent the motors from becoming loose or dislodged. With the motors securely attached, your robot car will move smoothly and efficiently, making it easier to control using Wi-Fi from your smartphone.
fix all motors

Using the adhesive of your choice, carefully attach each motor to the acrylic sheet. Make sure to align the motors to face in the right direction and space them out evenly to ensure balance.
Once you’ve attached all four motors, your robot car will start to take shape. With the motors securely fixed in place, you can move on to the next steps of the assembly process, such as attaching the wheels and motor shield.
Wiring motors
Start by connecting the cables to the DC motors to wire up your robot car. Make sure to match the color of the cable to the corresponding wire on the motor (e.g. red to red, green to green) so that the polarity is correct.

Remember, each cable must be connected to the correct wire in order for your Wi-Fi Controlled Robot Car to work as intended. Double check your connections before testing your robot to avoid any potential issues.
Attaching tires
To attach the tires, slide them onto the shafts of the DC motors. Ensure that they fit snugly and are appropriately aligned, as this will ensure the robot moves smoothly and doesn’t tip over.

Structure of wifi control

Wire up the L298n Motor shield

Wiring the motor sheild
Connect the red wire from the NodeMcu to the power rail on the breadboard.
Connect the black wire from the NodeMcu to the ground rail on the breadboard.
Connect the ENA pin on the motor shield to pin D5 on the NodeMcu.
Connect the IN1 pin on the motor shield to pin D8 on the NodeMcu.
Connect the IN2 pin on the motor shield to pin D7 on the NodeMcu.

Connect the ENB pin on the motor shield to pin D6 on the NodeMcu.
Connect the IN3 pin on the motor shield to pin D4 on the NodeMcu.
Connect the IN4 pin on the motor shield to pin D3 on the NodeMcu.
Once all the wires are connected according to the circuit diagram. Remember to double-check all the connections before powering it on.
Placing NodeMcu

Installing code
Connect your NodeMcu to your computer using a USB cable.
Open the Arduino IDE software on your computer.
Go to File > enter the following link: Click this to download.
Download the code for the Wi-Fi Controlled Robot from the link provided.

Open the downloaded code in the Arduino IDE.
Upload the code to the NodeMcu by clicking the “Upload” button in the Arduino IDE.
Once the code is uploaded, disconnect the NodeMcu from your computer.
By following these steps, you can install the code in your NodeMcu and make your Wi-Fi Controlled Robot functional. Make sure to select the correct board and library to avoid any errors.
Adding battery shield

Adding battery pack
To connect two batteries in parallel, you need to connect the positive terminal of one battery to the positive terminal of the other battery using a wire. Then, connect the negative terminal of one battery to the negative terminal of the other using another wire. This will create a parallel circuit, allowing the batteries to work together to power the robot.

Install the APK in your Android version to download the APK
Next, please navigate to the folder where you saved the APK file and tap on it to begin the installation. Follow the on-screen instructions to complete the installation.
Connecting wifi
Turn on the wifi module on your smartphone and connect to the wifi network created by the NodeMcu.
Open the installed APK of the wifi controlled robot on your smartphone and set the IP address to connect to the wifi.

Setting IP address
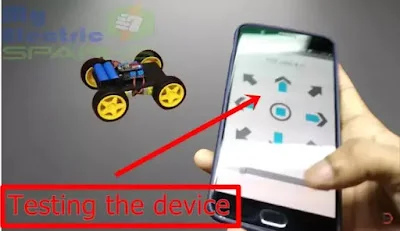
Testing the device
- To test the Wifi Controlled Robot Car, turn on the robot and connect the NodeMcu to a power source. Then, open the APK installed on your Android smartphone and connect it to the same wifi network as the robot.
- Once connected, you will see a virtual joystick on your smartphone screen that you can use to control the robot’s movement. Move the joystick in the direction you want the robot to move, and it should respond accordingly.
- You can also experiment with different movements and directions to see how the robot responds. For example, you can move the robot forward, backward, left, right, or even in circles.
- In addition to the joystick, the APK may have additional features and settings that you can explore to customize the robot’s performance. You can add more sensors or components to the robot to make it more advanced and functional.
Troubleshooting tips for common issues:
When you are building your Wi-Fi-controlled robot car, you might run into some problems. But don’t worry; here are some tips to help you troubleshoot those problems:
- If your robot car is not moving, ensure your motors are connected correctly, and your wires are securely connected to the motor shield. Check that your batteries are fully charged and connected to the robot car.
- If the car is not connecting to Wi-Fi: Double-check that you have entered the correct IP address in the app and that your smartphone is connected to the same Wi-Fi network as your robot car. If you are still having trouble, try resetting the NodeMcu.
- If the car is moving in the wrong direction: Make sure the wires to the motors are connected correctly. Switch the wires around if the motor is spinning in the wrong direction.
- If the car is not responding to the app: Check that your smartphone is connected to the Wi-Fi network and that you have entered the correct IP address in the app. Also, ensure your NodeMcu is connected to the motor shield and your batteries are fully charged.
If you still need help, feel free to ask for help. You can leave a comment or contact someone experienced in robotics for assistance.
READ MORE:
DIY Home Automatic Floor Cleaner Robot using Arduino And Ultrasonic SensorHow to Make Your Own Automatic Hand Sanitizer Dispenser Without Arduino: A Step-by-Step Guide
Corona Virus Live Updater Using Arduino (updated)
How to Build an Arduino Obstacle-Avoiding Car: A Step-by-Step Guide: Build Your Own Wi-fi Controlled Robot Car Using NodeMcu: A Fun and Easy DIY Project


Thanks for the article post.Really thank you! Great.
A big thank you for your blog post.Thanks Again. Will read on…