
Hey there! So, you’ve probably heard about the Coronavirus. It’s a severe disease that’s been affecting people all around the world. One of the best ways to protect yourself from it is by washing your hands frequently. But, with so many people using public places like offices and stores, it’s hard to know if the surfaces you’re touching are clean.
That’s why some smart people came up with a new device called the “Automatic Homemade Sanitizer” that makes washing your hands without touching anything easy! It’s a small machine that dispenses sanitizer automatically when it detects your hands underneath it
That’s why some smart people came up with a new device called the “Automatic Homemade Sanitizer” that makes washing your hands without touching anything easy! It’s a small machine that dispenses sanitizer automatically when it detects your hands underneath it.
What’s so great about it?
Well, for one thing, it’s affordable! Unlike automatic sanitizers that cost much money and require complicated programming skills, this one costs only $3 and doesn’t even need an Arduino to work.
Why is this important?
With so many people getting sick from the Coronavirus, taking precautions to prevent its spread is essential. Washing your hands is one of the most effective ways to do that, but finding a clean place to do it can be challenging. That’s why the Automatic Homemade Sanitizer is such a game-changer! It’s perfect for public businesses, offices, and homes.
What’s the best part?
The best part is that you can make one yourself! You only need the components, some essential tools, and a little time. We have explained step-by-step instructions in detail on how to make your Automatic Homemade Sanitizer.
What do the experts say?
According to tech website reviews, the Automatic Homemade Sanitizer is an excellent solution for keeping your hands clean and reducing the risk of contracting COVID-19. It’s an affordable and easy-to-understand solution for anyone looking to take precautions against the virus.
So, there you have it! A new, affordable, and easy-to-use way to keep your hands clean and stay safe from the Coronavirus!
Suggestions: Coronavirus live Updater
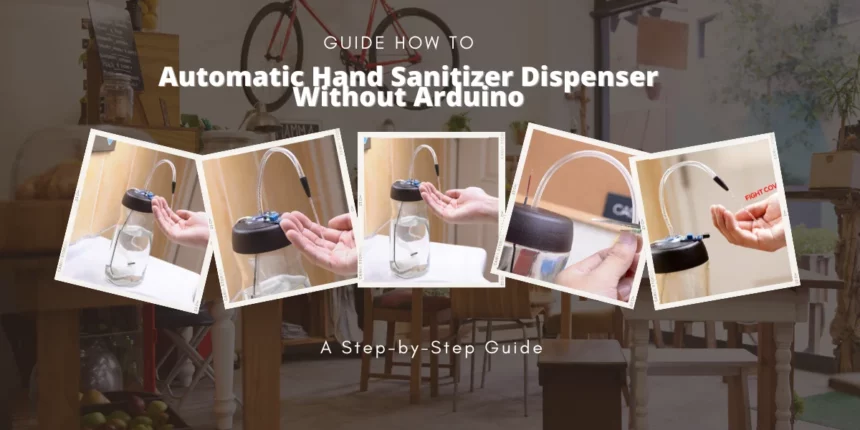
How to Make Your Automatic Homemade Sanitizer
Keeping your hands clean is essential to staying healthy, especially with the threat of COVID-19 still present. One easy way to do this is by using an automatic sanitizer. But did you know you can make one at home? Let’s look at what you need to make your automated Homemade Sanitizer.
Components Required for Homemade Sanitizer:
Making your automatic sanitizer doesn’t require a lot of fancy equipment. You can easily find everything you need at a store or online. Here’s what you’ll need to get started:
- Transistor TLP 32C
- Resistor 1k ohm
- Proximity sensor (FC51)
- DC water pump
- Bottle
- Some wires
- Glue gun
- Data cable or any DC source
Now, you might be wondering what some of these things are. Let’s break it down.
What are Transistors and Resistors?
What is a Proximity Sensor?
What is a DC Water Pump?
You’ll need to connect all the components to make your automatic sanitizer. You’ll also need a bottle to hold the sanitizer and a glue gun to attach the pieces to the bottle. You can use some wires to connect everything and a data cable or DC source to power the device.
According to tech websites, making your automatic sanitizer is an affordable and effective solution for staying healthy during the COVID-19 pandemic. Plus, it’s a fun and satisfying DIY project.
Working of Homemade Sanitizer Device:
The homemade automatic sanitizer device consists of almost eight components, but the two main components are the transistor and proximity sensor. The proximity sensor detects obstacles, and when you put your hand near it, it activates the DC water pump to dispense sanitizer. The transistor and resistor create a circuit that powers the device.
Tech websites have reviewed the homemade automatic sanitizer device and found it to be a cost-effective and easy-to-make solution for maintaining good hand hygiene. You don’t have to spend much money on expensive commercial devices when you can make your own at home.
One tech website had this to say about the homemade automatic sanitizer device: “The homemade automatic sanitizer device is a great way to keep your hands clean during the COVID-19 pandemic. With its simple construction and affordable components, this device is perfect for those looking for a cost-effective solution.”
By following the given step-by-step instructions and understanding how the homemade automatic sanitizer device works, you can build your device and keep your hands clean and free from harmful germs. This device is an excellent way to stay healthy and prevent the spread of COVID-19, so why not try it?
Circuit Diagram:
When it comes to making your own automatic homemade sanitizer, the circuit diagram is a crucial element. To ensure that the device functions correctly, it’s important to wire it up accurately. If you don’t have a battery, don’t worry – you can use a data cable instead. These are the cables used to charge mobile phones or connect them to adapters, so they work perfectly as a power source for your homemade sanitizer.
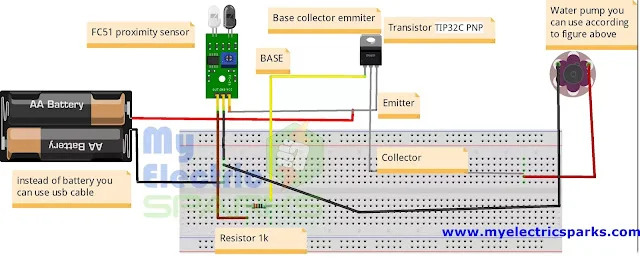
One of the most crucial components of this project is the DC water pump. This is the part of the device that will dispense the sanitizer when you put your hand under the sensor. If you’re not sure where to get one, there’s a link provided with the diagrams that you can use to purchase it. But if you’re having trouble finding any of the other parts, don’t worry – just leave a comment below, and we’ll provide you with a list of components along with their information. To make things easier for you, we recommend purchasing the components from the given link to avoid any potential issues.
Step-by-Step Construction
Time needed: 1 hour and 10 minutes
If you’re interested in making your own automatic homemade sanitizer, here’s a step-by-step guide to help you get started:
- Buy a DC water pump.
The DC water pump is essential to the automatic homemade sanitizer device. Its function is to pump the sanitizer out of the bottle and onto your hands without manual pressing or touching. This is important because it helps to prevent the spread of germs, including the coronavirus.
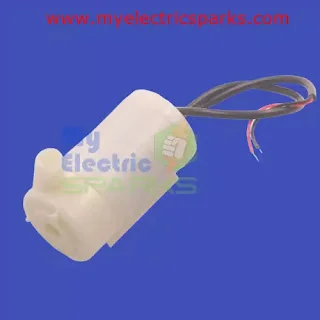
DC water pumps are readily available in the market, and you can find them at electronic stores or online. When buying a DC water pump, you must ensure it’s compatible with the other components you’ll be using in your sanitizer device. If you need help deciding which pump to choose, you can follow the link to purchase a specific pump recommended for this project. - Medical Pipe
You will need to connect a pipe to the DC water pump. This pipe will transfer the sanitizer liquid from the bottle to your hands. You can use any tube, but the best option is to use a medical-grade pipe, as it will ensure the cleanliness and safety of the sanitizer.
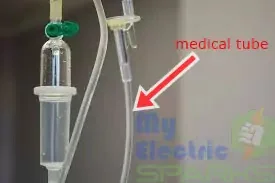
You can easily find such pipes at a local medical store or online. However, if you have any other ideas, feel free to use them and share them with us in the comments section. - Proximity Sensor FC51
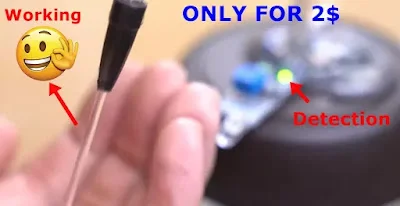
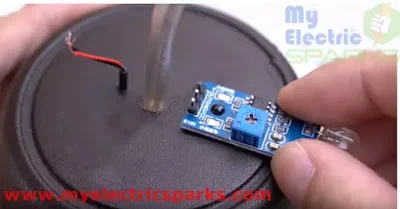
We must arrange a proximity sensor called FC51, essential for the automatic homemade sanitizer to work. This sensor is very cost-effective and can be easily found in the market or ordered online from websites like Amazon.
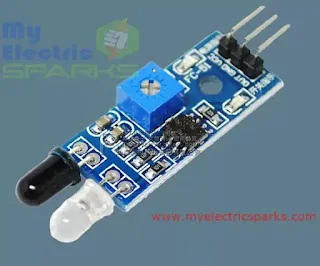
A proximity sensor works on the principle of detecting obstacles, and it can detect the presence of an object without physical contact. In this case, the sensor will detect when a hand is placed under the dispenser and activate the water pump to dispense the sanitizer without any physical contact.
If you need help finding the FC51 proximity sensor, you can buy it online. These sensors are usually sold in packs and cost only a few dollars. Once you have the sensor, you can proceed to the next step. - Transistor TLP 32C
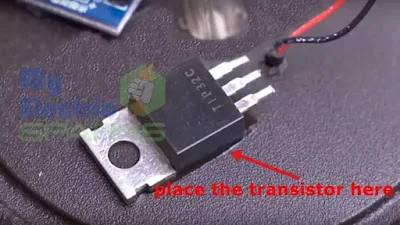
Transistor TLP 32C is a type of optocoupler transistor that is used for switching power to the load. It is a critical component of the homemade automatic sanitizer device, and you should use the same type of transistor to avoid any issues with the circuit.
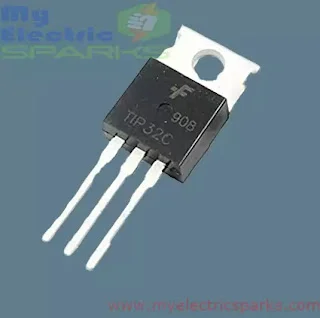
You can easily find this transistor in electronic markets or online stores like Amazon or eBay. Check the specifications and buy a genuine TLP 32C transistor to ensure the device’s proper functioning. - Arrange Resistor of 1k ohm
A resistor is an electronic component that restricts the flow of electric current through a circuit. In this step, you need to arrange a resistor of 1k ohm, which is commonly used in electronics projects.
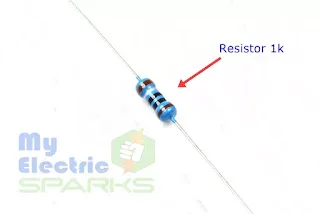
If you don’t have a 1k ohm resistor, you can use a 1.5k ohm resistor instead. However, please do not use a resistor with a lower value than 1k ohm, as it can cause damage to the circuit. If you only have a 500-ohm resistor, you can connect two in series to get an equivalent resistance of 1k ohm. This will work fine for the project - Arrange the wires
In this step, you must arrange some suitable wires for the device. These wires will be used to connect all the components of the device.
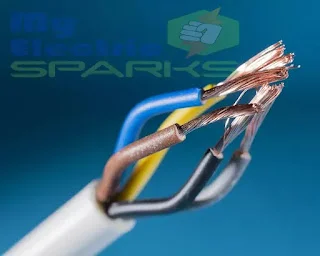
You can easily find these wires in any electronics store, and they are not expensive, costing no more than 0.3$ for a bunch of cables. You must choose the appropriate length and color of the wires according to your convenience. It’s crucial to ensure the cables are correctly connected and secured to avoid loose connections or short circuits. - Arrange a data cable
For this step, you must arrange a data cable you no longer use or don’t mind cutting. Cut one end of the data cable and strip the wires, which will be used to connect the components of the sanitizer device.
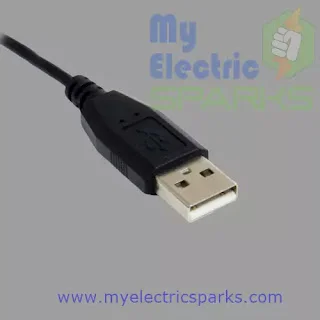
It’s important to note that you can also use a battery to power the device, but it will be more expensive than a data cable. Using a data cable is more cost-effective and convenient as it can be easily plugged into a power source. - Select Container

You can use a small plastic bottle or any disposable container that can hold the sanitizer for the container. The container size depends on your preference and the amount of sanitizer you want to dispense at a time. Make sure to clean and dry the container before use to prevent any contamination. - Inserting pipe in the water pump
To proceed with step 9, take the pipe you acquired in step 2 and insert one end into the inlet of the DC water pump. Make sure to push the tube in so that it fits snugly. The other end of the pipe will dispense the sanitizer, so wait to cut it.
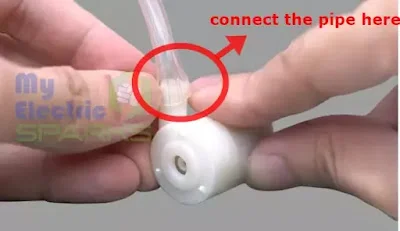
The DC water pump will ensure that the sanitizer is dispensed in the right amount and at the right time. Using the same pump mentioned in the previous steps or buying it from the given link is essential to ensure compatibility and better functioning. - Tighten the tube
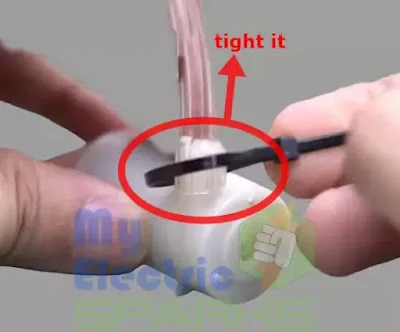
After inserting the tube into the DC water pump, tighten it securely so it won’t come off. You can use any adhesive, like glue or tape, to hold it tightly. This will prevent leakage and ensure the sanitizer flows smoothly through the tube.
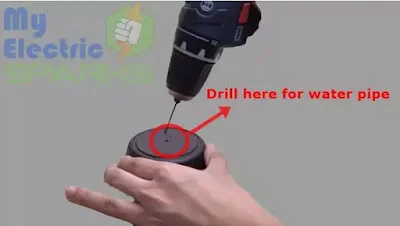
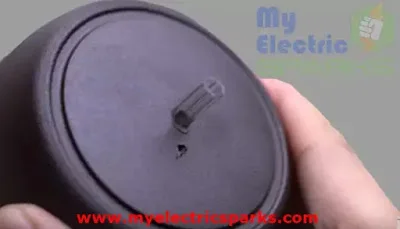
- Create a hole in the bottle cap
In this step, you must create a hole in the bottle cap for the water pipe to pass through. Use a drill machine or any sharp tool to make a small hole. Be careful while drilling; you don’t want to break the cap or hurt yourself.
- Drilling for the wires
To proceed with this step, you need to drill another hole in the bottle cap. This time, the hole is for the wires of the water pump.
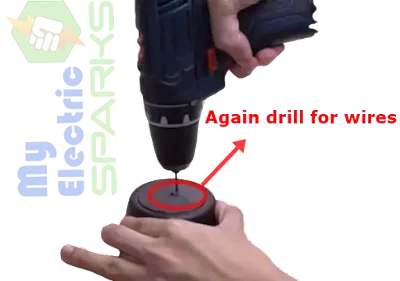
The position of hole should be at a suitable place, which can easily connect the wires to the proximity sensor and transistor. Ensure the hole is manageable; otherwise, the cables will not fit correctly. - Drilled Two Holes
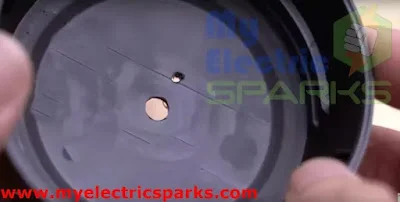
In this step, you need to ensure that the diameter of both holes is the same. This will ensure the pipe and wires fit tightly and do not come loose. You can use a drill or any other suitable tool to ensure the holes are the same size.
- drilling completed
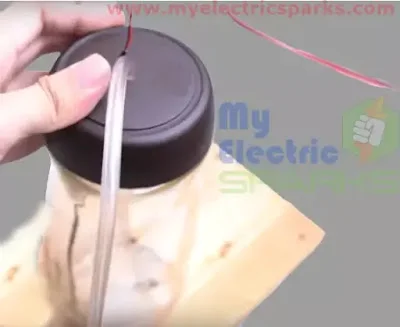
In this step, you need to insert the pipe into the hole drilled in the previous step. It would be best if you made sure that the pipe fits perfectly into the hole and is tightly bound. Once the pipe is inserted, it should look like the image below. This will ensure that the sanitizer solution can flow through the pipe smoothly.
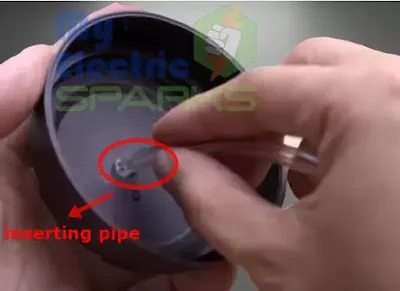
- Pipe
You need to take the pipe and push it through the hole drilled in Step 11. Make sure that the pipe is pulled through so that it comes out on the other side of the bottle. This will ensure the pipe is securely fixed in the bottle and won’t come out.
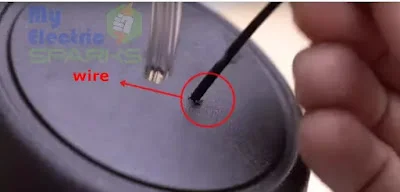
- drill a hole for wires
In this step Pull the wires of the water pump through the hole you drilled earlier in Step 12. Ensure the wires are correctly passed through the hole without any damage or cuts.
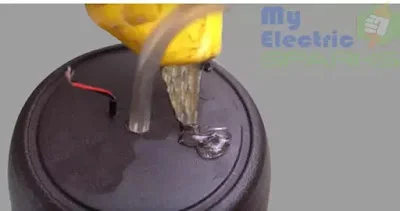
- After drilling and wiring
After pulling the wires of the water pump through the hole drilled in Step 12, the setup should look like the image below. The water pipe should go into the bottle, and the wires should come out of the other hole. Make sure that both the pipe and wires are securely attached and not loose.
- Glue it here
It’s time to assemble the components, so apply some glue to stick the parts together, as shown in the image below.
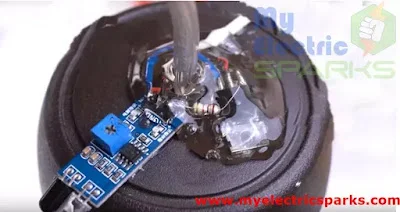
- Placing the proximity sensor
Now, place the Proximity sensor and attach it firmly to the bottle with the help of glue or any other adhesive. Ensure that it is not loosely attached and that you don’t face any difficulties while using it.
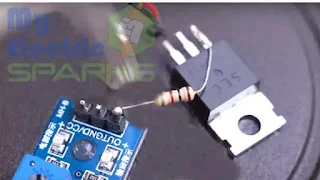
- Placing Transistor
As shown in the figure below, you need to place the Transistor TLP32C and attach it permanently using glue. Make sure it is securely attached and not loosely connected. This will ensure the proper functioning of the device.
- Wiring up according to the Circuit
As shown in the figure below, you need to place the Transistor TLP32C and attach it permanently using glue. Make sure it is securely attached and not loosely connected. This will ensure the proper functioning of the device.
- Glue all the components
After combining the components, adding some glue for safety is recommended. This step is not mandatory but will ensure that the components stay securely in place and prevent accidental disconnection.
- Power on the Automatic Homemade Sanitizer Circuit using the USB cable.
Now, let’s understand the two LEDs:
LED1 indicates the power supply to the proximity sensor. It will light up when the sensor is receiving power.
LED2 indicates the detection of hands. When the proximity sensor detects the presence of hands, the LED2 will start blinking.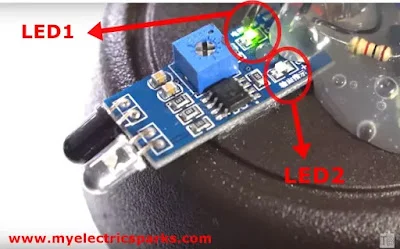
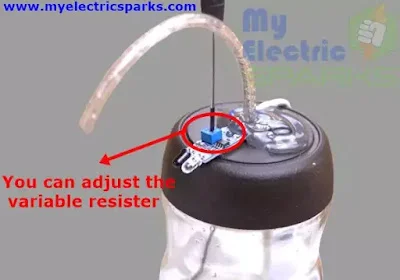
- Adjusting the variable Resistor
Finally, connect the USB cable to power up the device. You can also use a power bank or any other power source that provides 5V. Once connected, turn on the power source and test the device by placing your hand close to the proximity sensor. If everything is working correctly, LED2 should blink, indicating the detection of your hand.
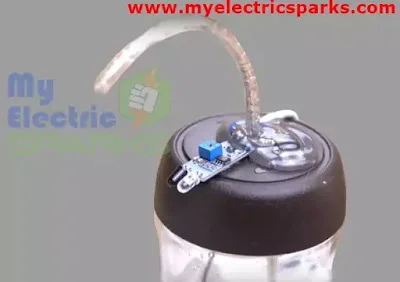
Congratulations! You have successfully built a touchless water dispenser. You can now use this device to dispense water without touching the bottle or the dispenser, which can be helpful in various situations where hygiene is essential. - final product
This is what your final product will look like after completing all the steps mentioned above.
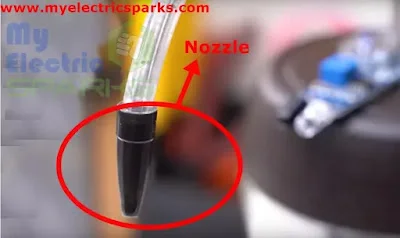
- Adding nozzle
Attach the nozzle to the end of the water pipe using glue or a clamp. This will help control the flow of water and prevent splashing.
Conclusion:
In conclusion, we have learned how to create an automatic homemade hand sanitizer without needing an Arduino board. Using simple and low-cost components such as a proximity sensor, transistor, resistor, water pump, and a few other materials, we can create a fully functional and practical hand sanitizer dispenser that detects the presence of hands and dispenses sanitizer accordingly.
This project provides a low-cost alternative to commercial automatic hand sanitizer dispensers and an excellent example of how we can use technology to address everyday problems. With some basic knowledge of electronics and the right tools, anyone can build this project and contribute to the fight against the spread of germs and viruses.
More Stories:
Corona Virus Live Updater Using Arduino (updated)How to Build an Arduino Obstacle-Avoiding Car: A Step-by-Step Guide
Password-Based Door Lock System Using Arduino: A Step-by-Step Guide: How to Make Your Own Automatic Hand Sanitizer Dispenser Without Arduino: A Step-by-Step Guide


This article is in fact a nice one it assists new the web people, who are wishing for blogging.