Introduction; This article is based on a password-based door lock system using Arduino. It was introduced for safety measures as safety is most important in personal lives. This project was invented for people’s comfort and satisfaction, and nowadays, every developing country uses this project. Now let’s come to the topic.
Study some basic information before going toward the main topics OF the PASSWORD-BASED DOOR LOCK SYSTEM USING ARDUINO.
What is a password-based door lock system using Arduino?
Password-based door lock system using Arduino is based on a password. When the password is typed, it will open the door according to the correct password.
You can follow the wise step procedure below.
Components Required password-based door lock system using Arduino
The Arduino-based door lock system uses the following elements.
 |
 |
Working on a password-based door lock system using Arduino
The default password is “1234“.
You can change the password according to your need .when you enter the password, and the servo motor will move to 180 degrees with a delay of 10 ms. You can change the uncertainty of the motor according to your need. After that, the led will turn on; if you want to change the password, press #.
After some delay, the servo motor will complete its round and return to its original state. The complete video is shown below.
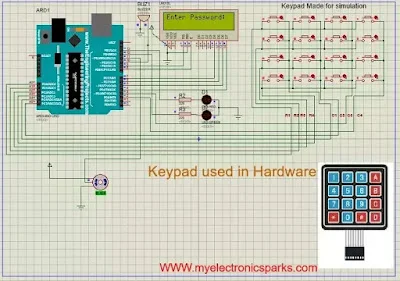
Circuit installation of password-based door lock system using Arduino
- At first, use LCD 16*2. If you are unable to find you can contact us
- It should be noted that the library for Lcd should be installed as it includes liquid crystals.
- Wiring the Arduino according to the diagram as shown in the figure

- Figure pin shows 1 and 5 of Lcd are set to ground.
- Pin 2 of Lcd is attached to the 5v, as shown.
- Pin 4 is connected to pin 9 of Arduino,
- And pin 6 of Lcd is connected to pin 8 of Arduino.
- Pin 11 of Lcd is connected to pin 7 of Lcd, as shown
- Pin 12 of LCD is connected to pin 6 of Lcd, As a shown
- Pin 13 of LCD is connected to pin 5 of Lcd, As a shown
- Pin 14 of LCD is connected to pin 4 of Lcd, As shown
Buzzer

buzzer installation
One pin of the buzzer that is attached to 5v of the breadboard
And then, the pin is connected to 10 pins of Arduino, as shown
Servo motor
Now we connect the servo motor to the Arduino
One red pin of the servo is connected to 5v
The other black pin is connected to the ground of the Arduino
And the yellow pin (mid) is attached to the 11 pins or Arduino, as shown in the figure

Attaching keypad
- The digital pins of the keyboard are connected to Arduino. Use the exact defining pin as shown in the figure
- Ensure the keypad library is installed, i.e., include the keypad.h
- One pin of the pad is attached to pin A0, another pin A1 and so on, as shown in the figure

If the pin of the keypad is left, don’t worry; you are doing it correctly sometimes, and there is an issue with the hardware. The keypad is used for a password when any key is pressed.
Installing LEDs
One led is attached to the resister, and then it is connected to 12 pins of Arduino. The other end of the Led is attached to the ground. The different resister is attached to the resister, then connected to pin 13 of Arduino, and the other end is attached to the bottom, as shown in the figure.

Circuit Simulation And Arduino Files
For downloading the Arduino file, you can click here, and for the proteus file, please click here. For more information, you can comment below.
Advantages
Intelligent locks are, no doubt, really convenient. These devices allow you to forget your home keys completely; the automatic opening and locking system, activated through the Code system, eliminates this dilemma.
This system is incredibly convenient for families where parents often rush to rescue their children, who have forgotten the keys and cannot enter the house after a night out with their loved ones.
Disadvantages
Smart locks aren’t renewed automatically and can easily be presented as tampering. Being electronic devices, they might be violated by IT experts who can create unauthorized fake access codes and leak our data. If you forget your system, unlocking your home will be much more challenging. The device may have a fault, which may need time and waste your precious time.
The Circuit Diagram password-based door lock system using Arduino
The circuit diagram of proteus is as below.

We have checked that everything is working correctly, including simulation and hardware; if you have any problems, please comment below.
Advantages of Password-Based Door Lock System
- This Project offers security
- The power consumption is lower
- Commonly used components
- The Project is easy and simple
Applications of Password-Based Door Lock System
- This simple circuit could be employed in homes to provide greater security.
- It can be utilized by companies to provide authorized access to secure areas.
- With just a few tweaks, with a slight modification, this Project could be used to manage the load switch using passwords.
Limitations of Password-Based Door Lock System
- It is a low-range circuit. i.e., it isn’t feasible to control it remotely.
- If you remember your password, gaining access to the door will be possible.
Upgraded Password-Based Door Lock System Using Arduino
The upgraded password-based door lock system using Arduino.

TechRadar says, “the upgraded door lock system provides added convenience, security, and peace of mind, making it a worthwhile investment for those looking to upgrade their home’s security.”
Integration with Smartphone
Thanks to the system’s smartphone integration, you can now unlock your door with a simple tap on your phone screen. The door lock system uses Bluetooth to connect with your phone, ensuring a seamless and secure user experience.
Biometric Authentication
With biometric authentication, you can unlock your door with your fingerprint or face recognition. This feature adds an extra layer of security, ensuring that only authorized users can access your home.
Cloud Connectivity
The upgraded door lock system also offers cloud connectivity, which allows you to monitor and control your door lock from anywhere remotely. You can also receive notifications on your phone whenever someone unlocks the door, giving you peace of mind and control over your home’s security.
Voice Commands
You can now unlock your door using voice commands with a simple voice prompt. This feature makes it easier to enter your home without needing keys, especially for those with limited mobility or carrying groceries.
Battery Backup
The door lock system now comes with a battery backup, ensuring you can unlock your door even during power outages. This feature provides added security and peace of mind, knowing you can always access your home regardless of unforeseen circumstances.
Machine Learning Algorithms
The door lock system now also incorporates machine learning algorithms, which adapt to your usage patterns, ensuring that the system is constantly learning and improving its functionality.
Integration with Home Automation Systems
The door lock system can now integrate with home automation systems, allowing you to control your door lock alongside other smart home devices. This feature adds convenience and simplifies the management of your home’s technology.
CNET also praised the system, stating that “the integration with smartphones, biometric authentication, and cloud connectivity make the door lock system a must-have for those looking to enhance their home’s security and convenience.”
Conclusion
In this article, I’ve shown you how to build a password security lock Utilizing Arduino Keypad, Keypad, and Servo motor. I hope that you enjoyed reading this post. Do you have concerns, questions, or suggestions? Please let me know by commenting below.
The upgraded password-based door lock system using Arduino provides numerous benefits, including convenience, security, and peace of mind. With its integration with smartphones, biometric authentication, cloud connectivity, voice commands, battery backup, machine learning algorithms, and home automation systems, the door lock system is a worthwhile investment for those looking to upgrade their home’s security and technology.


