How to Interface oled display with Esp32 ?

This tutorial will show you how to Interface the Esp32 display with the OLED Development Board. This project uses an OLED Graphic Display based on SSD1306 OLED driver IC. It communicates via SPI. Use ESP32 with OLED for text, bitmap images, graphics, etc., in your DIY project.

Introduction

OLED, or Organic Light Emitting Diode, is an advanced display technology that uses a layer of organic compound between two electrodes (anode & cathode). When voltage is applied across these electrodes, the organic material emits light.

OLED Displays are unique because they emit light and don’t require any additional backlight. OLED Displays are often brighter, more contrasty, and have better viewing angles than LCDs.

OLED Displays also have a feature called deep black. Each pixel in OLED Displays emits its light, so each pixel can be turned OFF to create a black color.

Introducing 0.96 inch OLED Display

This tutorial will use the OLED display model, a mono-color display measuring 0.96 inches and 128×64 pixels. Comparable to other displays.

OLED displays don’t need a backlight, which makes them very visible in dark environments. OLED displays consume less energy than other displays because they only use power when turned on.

Our model has four pins and can communicate with any microcontroller that uses the I2C communication protocol.

Some models come with an additional reset pin, while others communicate using the SPI protocol.

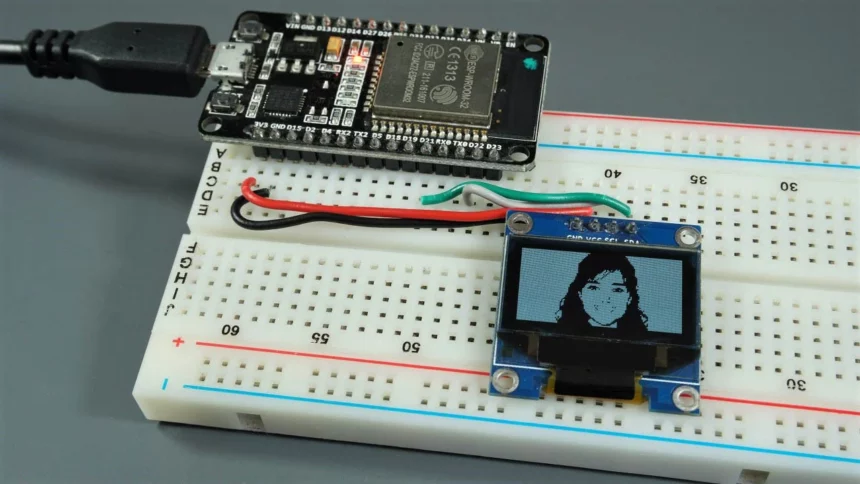
A Brief Note on Interface Esp32 display with Oled

Are you interested in using an OLED Display for your DIY Projects? You should display important information such as IP Address and Web Server Address on a display. The SSD1306 OLED Display Module will do the trick.

Interface oled display with Esp32

This module is a Monochrome OLED Display that has a resolution of 128 pixels by 64 Pixels. It measures 0.96 inches diagonally. This OLED Display uses the SSD1306 OLED Driver IC.

Three types of communication interfaces are available for SSD1306 OLED Displays:

  • 8-bit Parallel Interface 6800
  •  3 or 4-wire SPI
  •  I 2C

The I 2C OLEDs and the SPI-type OLEDs are the most common. You can change the configuration of an SPI OLED from I 2 C to I C by soldering/de-soldering SMD resistors. This model uses 4-wire SPI Communication.

Interface oled display with Esp32

The SSD1306 OLED Driver IC is 128 x 64-bit Graphic Display Data RAM (GDDRAM). Each page contains 128 segments. It is divided into 8 pages (PAGE 0 through Page 7). Each segment is 8-bits long and represents one pixel on the display.

So 8 Pages * 128 Session * 8 Bits = 8192 bits (1024 Bytes).

Interface oled display with Esp32

Serial OLED Display SSD1306 Pin Wiring

The wiring of the serial OLED display is easy because it uses the I2C communication protocol. The following table can be used as a guide.

PinESP32
Vin3.3V
GNDGND
SCLGPIO 22
SDAGPIO 21

Alternatively, you can use the following schematic diagram to connect the ESP32 to an OLED display

Interface oled display with Esp32

In this case, we are using the I2C communication protocol. The ESP32’s most appropriate pins for I2C communication are GPIO 22 and GPIO 21.

Use the following GPIOs using an OLED display that supports SPI communication protocol.

  • GPIO 18 CLK
  • GPIO 19 – MISO
  • GPIO 23: MOSI
  • GPIO 5: CS

Monochrome 0.96” OLED Display Pinout Diagram

Because of the driver, the pin configuration of an OLED is similar to other types. The driver receives the primary input and then performs all the functions.

There are two types of OLED Display communication pins. One is SPI; the other is I2C. Although the OLED is faster for SPI communication, it is very popular for I2C communication. Because of the low number of pins, the OLED is very popular. All Power and Communication pins can be found here.

Power Pins

PINSDETAILS
Pin1GND
To make sure that you are working properly, connect the Pin1 and the ground pin.
Pin2Power (VCC/VDD, 5V, 5V)
OLED has a single power pin that handles all power inputs.

Communication pins

PINSDETAILS
Pin3SCK (CLK and SCL)
The Pin3 will provide a common clock signal to both the microcontroller/Arduino and OLED. It will also act as a clock pin in SPI and I2C communications.
Pin4SDA (MOSI and DI)
This pin will receive data from the Arduino/controller. OLED will only allow data input. There won’t be any data output. The Pin4 will be the data input device for I2C and SPI.
Pin5RES (Reset and RST)
The reset pin will reset the OLED driver’s internal buffer.
Pin6D/C (A0)
Pin6 will modify the command and data registers for input requirements.
Pin7Chip Enable (CS CE)
The Pin7 pin is an enable button that will activate the display when the input signal is LOW.

Interface Esp32 Display with OLED

Let’s now look at how to interface ESP32 Displays with OLED. The communication interface is SPI. This is the first thing you need to know. Look at the Pinout for ESP32 to identify the SPI Pins.

Interface oled display with Esp32

The above image shows that HSPI (and VSPI) are available on the ESP32 Development Board to SPI Interface. Let’s use the VSPI peripheral. These pins are for VSPI in ESP32:

VSPI PinGPIO Pin
VSPI_MOSIGPIO 23
VSPI_MISOGPIO 19
VSPI_CLKGPIO 18
VSPI_CSGPIO 5

NOTE: ESP32 is equipped with 4 SPI peripherals. (SPI0, SPI1, HSPI, VSPI, and SPI1 respectively). SPI0 is dedicated to SPI Flash IC. SPI1 shares hardware with SPI0. This leaves HSPI VSPI to interface SPI Devices.

Below is a table showing the connections between the OLED Display Module and ESP32. We must make seven connections because this is an OLED Display Module with SPI.

OLED DisplayESP32
GNDGND
VCC3.3V
D0 (SCK)GPIO 18
D1 (MOSI)GPIO 23
RESGPIO 17
DCGPIO 16
CSGPIO 5

Suggested Article: Raspberry Pi Pico Programming with MicroPython | A Beginner’s Guide

Installing SSD1306 OLED Library – ESP32

There are many libraries that can control the OLED display using the ESP32. This tutorial will use Adafruit_SSD1306 and Adafruit_GFX libraries.

These steps will help you install the libraries.

1. Go to the Arduino IDE. Sketch>Include Library>Manage Libraries. The Library Manager should open. The Library Manager should be able to open.

2. Type “SSD1306″. Use the search box to locate the SSD1306 library by Adafruit.

Interface oled display with Esp32

3. Type “After installing the SSD1306 library by Adafruit, type GFX Use “in the search box to install the library.

Interface oled display with Esp32

4. Restart your Arduino IDE after installing the libraries.

The Arduino IDE is required to program the ESP32. To do this, you will need the ESP32 add-on. Follow the next tutorial if you don’t have it.

Components Required for Interface Esp32 display with oled

  • ESP32 DevKit Development Board
  • OLED Display Module
  • Breadboard
  • Connecting Wires
  • Micro USB Cable

Circuit Diagram for Interface Esp32 display with oled

This is the circuit diagram of the Interfacing ESP32 Display with OLED.

Interface oled display with Esp32

suggested article: How to Write Data to RFID Card using RC522 RFID and Arduino

Preparing Arduino IDE for ESP32 OLED Display

You will need to download Arduino IDE libraries related to SSD1306 OLED Display before you can start writing code.

This tutorial will show you how to install ESP32 Boards in Arduino IDE. This tutorial is available first. Open the Arduino IDE, and then go to Tools -> Manage Libraries.

Interface oled display with Esp32

A Library Manager window will open. Type “ssd1306”, then click on the Search button. This library was created for monochrome OLED displays based on SSD1306 driver IC. Supported resolutions are 128×32 and 128×64.

Interface oled display with Esp32

After you have installed the SSD1306 Library, search “gfx” to install the Adafruit GFX Library. This library contains basic graphics such as lines, rectangles, and circles.

Interface oled display with Esp32

After downloading all necessary libraries, close the library manager window after downloading all the libraries, near the library manager window.

Test ESP32 OLED Display

Once we have made all necessary connections, it is time to create a test code for ESP32 that will display text and graphics on the OLED Monitor. This code tests various OLED Display features, including scrolling and inverted text. It also displays ASCII Characters. It also adjusts font size.

I also added code to display graphics such as rectangles, filled rectangles, and rounded rectangles.

Finally, I converted the logo into a bitmap and placed it on the OLED Display.

CODE for ESP32 OLED Display

#include <SPI.h>
#include <Wire.h>
#include <Adafruit_GFX.h>
#include <Adafruit_SSD1306.h>

#define SCREEN_WIDTH 128
#define SCREEN_HEIGHT 64

#define OLED_MOSI   23
#define OLED_CLK    18
#define OLED_DC     16
#define OLED_CS     5
#define OLED_RESET  17

Adafruit_SSD1306 display(SCREEN_WIDTH, SCREEN_HEIGHT,
  OLED_MOSI, OLED_CLK, OLED_DC, OLED_RESET, OLED_CS);

const unsigned char electronicshub_logo [] PROGMEM = {
  0x00, 0x00, 0x00, 0x00, 0x00, 0x00, 0x00, 0x00, 0x00, 0x00, 0x00, 0x00, 0x00, 0x00, 0x00, 0x00, 
  0x00, 0x00, 0x00, 0x00, 0x00, 0x00, 0x00, 0x00, 0x00, 0x00, 0x00, 0x00, 0x00, 0x00, 0x00, 0x00, 
  0x00, 0x00, 0x00, 0x00, 0x00, 0x00, 0x00, 0x00, 0x00, 0x00, 0x00, 0x00, 0x00, 0x00, 0x00, 0x00, 
  0x00, 0x00, 0x00, 0x00, 0x00, 0x00, 0x00, 0x00, 0x00, 0x00, 0x00, 0x00, 0x00, 0x00, 0x00, 0x00, 
  0x00, 0x00, 0x00, 0x00, 0x00, 0x00, 0x00, 0x00, 0x00, 0x00, 0x00, 0x00, 0x00, 0x00, 0x00, 0x00, 
  0x00, 0x00, 0x00, 0x00, 0x00, 0x00, 0x00, 0x00, 0x00, 0x00, 0x00, 0x00, 0x00, 0x00, 0x00, 0x00, 
  0x00, 0x00, 0x00, 0x00, 0x00, 0x00, 0x00, 0x00, 0x00, 0x00, 0x00, 0x00, 0x00, 0x00, 0x00, 0x00, 
  0x00, 0x00, 0x00, 0x00, 0x00, 0x00, 0x00, 0x00, 0x00, 0x00, 0x00, 0x00, 0x00, 0x00, 0x00, 0x00, 
  0x00, 0x00, 0x00, 0x00, 0x00, 0x00, 0x00, 0x00, 0x00, 0x00, 0x00, 0x00, 0x00, 0x00, 0x00, 0x00, 
  0x00, 0x00, 0x00, 0x00, 0x00, 0x00, 0x00, 0x00, 0x00, 0x00, 0x00, 0x00, 0x00, 0x00, 0x00, 0x00, 
  0x00, 0x00, 0x00, 0x00, 0x00, 0x00, 0x00, 0x00, 0x00, 0x00, 0x00, 0x00, 0x00, 0x00, 0x00, 0x00, 
  0x00, 0x00, 0x00, 0x00, 0x00, 0x00, 0x00, 0x00, 0x00, 0x00, 0x00, 0x00, 0x00, 0x00, 0x00, 0x00, 
  0x00, 0x00, 0x00, 0x00, 0x00, 0x00, 0x00, 0x00, 0x00, 0x00, 0x00, 0x00, 0x00, 0x00, 0x00, 0x00, 
  0x00, 0x00, 0x00, 0x00, 0x00, 0x00, 0x00, 0x00, 0x00, 0x00, 0x00, 0x0f, 0xff, 0xff, 0xff, 0x80, 
  0x00, 0x00, 0x00, 0x00, 0x00, 0x00, 0x00, 0x00, 0x00, 0x00, 0x00, 0x0f, 0xff, 0xff, 0xff, 0x80, 
  0x00, 0x00, 0x00, 0x00, 0x00, 0x00, 0x00, 0x00, 0x00, 0x00, 0x00, 0x0f, 0xff, 0xff, 0xff, 0x80, 
  0x00, 0x00, 0x00, 0x00, 0x00, 0x00, 0x00, 0x00, 0x00, 0x00, 0x00, 0x0f, 0xff, 0xff, 0xff, 0x80, 
  0x00, 0x00, 0x00, 0x00, 0x00, 0x00, 0x00, 0x00, 0x00, 0x00, 0x00, 0x0f, 0xff, 0xff, 0xff, 0x80, 
  0x00, 0x00, 0x00, 0x00, 0x00, 0x00, 0x00, 0x00, 0x00, 0x00, 0x00, 0x0f, 0xff, 0xff, 0xff, 0x80, 
  0x03, 0xe0, 0x07, 0xc3, 0x87, 0xcf, 0x03, 0x02, 0x11, 0x07, 0x04, 0x0f, 0xbd, 0xbd, 0xc7, 0x80, 
  0x03, 0xe4, 0x07, 0xc3, 0xc7, 0xcf, 0x07, 0x82, 0x11, 0x07, 0x8e, 0x0f, 0xbd, 0xbd, 0xc7, 0x80, 
  0x02, 0x04, 0x04, 0x06, 0xc1, 0x01, 0x84, 0xc2, 0x11, 0x0d, 0x8a, 0x0f, 0xbd, 0xbd, 0xf3, 0x80, 
  0x02, 0x04, 0x04, 0x04, 0x61, 0x00, 0x88, 0x42, 0x11, 0x08, 0x8a, 0x0f, 0xbd, 0xbd, 0xfb, 0x80, 
  0x02, 0x04, 0x04, 0x0c, 0x21, 0x00, 0x88, 0x43, 0x11, 0x10, 0x08, 0x0f, 0xbd, 0xbd, 0xfb, 0x80, 
  0x02, 0x04, 0x04, 0x08, 0x01, 0x00, 0x88, 0x23, 0x11, 0x10, 0x08, 0x0f, 0xbd, 0xbd, 0xfb, 0x80, 
  0x02, 0x04, 0x04, 0x08, 0x01, 0x00, 0x88, 0x23, 0x11, 0x10, 0x08, 0x0f, 0xbd, 0xbd, 0xfb, 0x80, 
  0x02, 0x04, 0x04, 0x08, 0x01, 0x00, 0x90, 0x23, 0x11, 0x10, 0x08, 0x0f, 0xbd, 0xbd, 0xfb, 0x80, 
  0x02, 0x04, 0x04, 0x08, 0x01, 0x00, 0x90, 0x22, 0x91, 0x10, 0x08, 0x0f, 0xbd, 0xbd, 0xf7, 0x80, 
  0x02, 0x04, 0x04, 0x08, 0x01, 0x00, 0x90, 0x22, 0x91, 0x10, 0x0e, 0x0f, 0xbd, 0xbd, 0xc7, 0x80, 
  0x03, 0x84, 0x07, 0x08, 0x01, 0x00, 0x90, 0x22, 0x91, 0x10, 0x06, 0x0f, 0x81, 0xbd, 0xc7, 0x80, 
  0x03, 0x84, 0x07, 0x08, 0x01, 0x07, 0x90, 0x22, 0xd1, 0x10, 0x03, 0x0f, 0x81, 0xbd, 0xf7, 0x80, 
  0x02, 0x04, 0x04, 0x08, 0x01, 0x07, 0x10, 0x22, 0x51, 0x10, 0x01, 0x0f, 0xbd, 0xbd, 0xfb, 0x80, 
  0x02, 0x04, 0x04, 0x08, 0x01, 0x06, 0x10, 0x22, 0x51, 0x10, 0x01, 0x0f, 0xbd, 0xbd, 0xfb, 0x80, 
  0x02, 0x04, 0x04, 0x08, 0x01, 0x02, 0x10, 0x22, 0x51, 0x10, 0x01, 0x0f, 0xbd, 0xbd, 0xfb, 0x80, 
  0x02, 0x04, 0x04, 0x08, 0x01, 0x02, 0x08, 0x22, 0x31, 0x10, 0x01, 0x0f, 0xbd, 0xbd, 0xfb, 0x80, 
  0x02, 0x04, 0x04, 0x08, 0x01, 0x01, 0x08, 0x22, 0x31, 0x10, 0x01, 0x0f, 0xbd, 0xbd, 0xfb, 0x80, 
  0x02, 0x04, 0x04, 0x0c, 0x21, 0x01, 0x08, 0x42, 0x31, 0x10, 0x01, 0x0f, 0xbd, 0xdb, 0xfb, 0x80, 
  0x02, 0x04, 0x04, 0x04, 0x61, 0x01, 0x88, 0x42, 0x31, 0x08, 0x99, 0x0f, 0xbd, 0xdb, 0xf3, 0x80, 
  0x02, 0x04, 0x04, 0x06, 0xc1, 0x00, 0x84, 0xc2, 0x11, 0x0d, 0x8b, 0x0f, 0xbd, 0xc3, 0xc7, 0x80, 
  0x03, 0xe7, 0xc7, 0xc3, 0xc1, 0x00, 0x87, 0x82, 0x11, 0x07, 0x8e, 0x0f, 0xbd, 0xe7, 0xc7, 0x80, 
  0x03, 0xe7, 0xc7, 0xc3, 0x81, 0x00, 0x83, 0x02, 0x11, 0x07, 0x06, 0x0f, 0xff, 0xff, 0xff, 0x80, 
  0x00, 0x00, 0x00, 0x00, 0x00, 0x00, 0x00, 0x00, 0x00, 0x00, 0x00, 0x0f, 0xff, 0xff, 0xff, 0x80, 
  0x00, 0x00, 0x00, 0x00, 0x00, 0x00, 0x00, 0x00, 0x00, 0x00, 0x00, 0x0f, 0xff, 0xff, 0xff, 0x80, 
  0x00, 0x00, 0x00, 0x00, 0x00, 0x00, 0x00, 0x00, 0x00, 0x00, 0x00, 0x0f, 0xff, 0xff, 0xff, 0x80, 
  0x00, 0x00, 0x00, 0x00, 0x00, 0x00, 0x00, 0x00, 0x00, 0x00, 0x00, 0x0f, 0xff, 0xff, 0xff, 0x80, 
  0x00, 0x00, 0x00, 0x00, 0x00, 0x00, 0x00, 0x00, 0x00, 0x00, 0x00, 0x0f, 0xff, 0xff, 0xff, 0x80, 
  0x07, 0xff, 0xff, 0xff, 0xff, 0xff, 0xff, 0xff, 0xff, 0xff, 0xff, 0xff, 0xff, 0xff, 0xff, 0x80, 
  0x07, 0xff, 0xff, 0xff, 0xff, 0xff, 0xff, 0xff, 0xff, 0xff, 0xff, 0xff, 0xff, 0xff, 0xff, 0x80, 
  0x00, 0x02, 0x00, 0x00, 0x00, 0x00, 0x00, 0x00, 0x00, 0x00, 0x00, 0x00, 0x00, 0x00, 0x00, 0x00, 
  0x00, 0x02, 0x00, 0x00, 0x00, 0x00, 0x00, 0x00, 0x00, 0x00, 0x00, 0x00, 0x00, 0x00, 0x00, 0x00, 
  0x00, 0x02, 0x00, 0x00, 0x00, 0x00, 0x00, 0x00, 0x00, 0x00, 0x00, 0x00, 0x00, 0x00, 0x00, 0x00, 
  0x00, 0x02, 0x00, 0x00, 0x00, 0x00, 0x00, 0x00, 0x00, 0x00, 0x00, 0x00, 0x00, 0x00, 0x00, 0x00, 
  0x00, 0x04, 0x00, 0x00, 0x00, 0x00, 0x00, 0x00, 0x00, 0x00, 0x00, 0x00, 0x00, 0x00, 0x00, 0x00, 
  0x00, 0x04, 0x00, 0x00, 0x00, 0x00, 0x00, 0x00, 0x00, 0x00, 0x00, 0x00, 0x00, 0x00, 0x00, 0x00, 
  0x00, 0x04, 0x00, 0x00, 0x00, 0x00, 0x00, 0x00, 0x00, 0x00, 0x00, 0x00, 0x00, 0x00, 0x00, 0x00, 
  0x00, 0x08, 0x00, 0x00, 0x00, 0x00, 0x00, 0x00, 0x00, 0x00, 0x00, 0x00, 0x00, 0x00, 0x00, 0x00, 
  0x07, 0xf0, 0x00, 0x00, 0x00, 0x00, 0x00, 0x00, 0x00, 0x00, 0x00, 0x00, 0x00, 0x00, 0x00, 0x00, 
  0x00, 0x00, 0x00, 0x00, 0x00, 0x00, 0x00, 0x00, 0x00, 0x00, 0x00, 0x00, 0x00, 0x00, 0x00, 0x00, 
  0x00, 0x00, 0x00, 0x00, 0x00, 0x00, 0x00, 0x00, 0x00, 0x00, 0x00, 0x00, 0x00, 0x00, 0x00, 0x00, 
  0x00, 0x00, 0x00, 0x00, 0x00, 0x00, 0x00, 0x00, 0x00, 0x00, 0x00, 0x00, 0x00, 0x00, 0x00, 0x00, 
  0x00, 0x00, 0x00, 0x00, 0x00, 0x00, 0x00, 0x00, 0x00, 0x00, 0x00, 0x00, 0x00, 0x00, 0x00, 0x00, 
  0x00, 0x00, 0x00, 0x00, 0x00, 0x00, 0x00, 0x00, 0x00, 0x00, 0x00, 0x00, 0x00, 0x00, 0x00, 0x00, 
  0x00, 0x00, 0x00, 0x00, 0x00, 0x00, 0x00, 0x00, 0x00, 0x00, 0x00, 0x00, 0x00, 0x00, 0x00, 0x00, 
  0x00, 0x00, 0x00, 0x00, 0x00, 0x00, 0x00, 0x00, 0x00, 0x00, 0x00, 0x00, 0x00, 0x00, 0x00, 0x00
};

void setup()
{
  Serial.begin(115200);
  if(!display.begin(SSD1306_SWITCHCAPVCC))
  {
    Serial.println(F("SSD1306 allocation failed"));
    for(;;);
  }
  
  display.clearDisplay();
  display.display();
  delay(1000);

  display.clearDisplay();
  display.drawBitmap(0, 0, electronicshub_logo, SCREEN_WIDTH, SCREEN_HEIGHT, SSD1306_WHITE);
  display.display();
  delay(1000);
  
  
}
void loop()
{
  AllPixels();
  TextDisplay();
  InvertedTextDisplay();
  ScrollText();
  DisplayChars();
  TextSize();
  DrawRectangle();
  DrawFilledRectangle();
  DrawRoundRectangle();
  DrawFilledRoundRectangle();
  DrawCircle();
  DrawFilledCircle();
  DrawTriangle();
  DrawFilledTriangle();
}

void AllPixels()
{
  int i;
  int j;
  display.clearDisplay();
  for(i=0;i<64;i++)
  {
    for(j=0;j<128;j++)
    {
      display.drawPixel(j, i, SSD1306_WHITE);
      
    }
    display.display();
    delay(30);
  }
  
  for(i=0;i<64;i++)
  {
    for(j=0;j<128;j++)
    {
      display.drawPixel(j, i, SSD1306_BLACK);
      
    }
    display.display();
    delay(30);
  }
  
}

void TextDisplay()
{
  display.clearDisplay();
  display.setTextSize(1);
  display.setTextColor(SSD1306_WHITE);
  display.setCursor(5,28);
  display.println("Electronics Hub");
  display.display();
  delay(3000);
}

void InvertedTextDisplay()
{
  display.clearDisplay();
  display.setTextColor(SSD1306_BLACK, SSD1306_WHITE);
  display.setCursor(5,28);
  display.println("Electronics Hub");
  display.display();
  delay(3000);
}

void ScrollText()
{
  display.clearDisplay();
  display.setCursor(0,0);
  display.setTextSize(1);
  display.setTextColor(SSD1306_WHITE);
  display.println("This is a");
  display.println("Scrolling");
  display.println("Text!");
  display.display();
  delay(100);
  display.startscrollright(0x00, 0x0F);
  delay(2000);
  //display.stopscroll();
  //delay(1000);
  display.startscrollleft(0x00, 0x0F);
  delay(2000);
  //display.stopscroll();
  //delay(1000);
  display.startscrolldiagright(0x00, 0x0F);
  delay(2000);
  display.startscrolldiagleft(0x00, 0x0F);
  delay(2000);
  display.stopscroll();
}

void DisplayChars()
{
  display.clearDisplay();

  display.setTextSize(1);
  display.setTextColor(SSD1306_WHITE);
  display.setCursor(0, 0);
  display.cp437(true);
  
  for(int16_t i=0; i<256; i++)
  {
    if(i == '\n')
    {
      display.write(' ');
    }
    else
    {
      display.write(i);
    }
  }

  display.display();
  delay(4000);
}
void TextSize()
{
  display.clearDisplay();

  display.setTextSize(1);
  display.setTextColor(SSD1306_WHITE);
  display.setCursor(0,0);
  display.println(F("Size: 1"));
  display.println(F("ABC"));

  display.setTextSize(2);
  display.setTextColor(SSD1306_WHITE);
  display.println("Size: 2");
  display.println(F("ABC"));

  display.display();
  delay(3000);
}

void DrawRectangle()
{
  display.clearDisplay();
  display.setTextSize(1);
  display.setTextColor(WHITE);
  display.setCursor(0,0);
  display.println("Rectangle");
  display.drawRect(0, 15, 90, 45, SSD1306_WHITE);
  display.display();
  delay(2000);
}

void DrawFilledRectangle()
{
  display.clearDisplay();  
  display.setTextSize(1);
  display.setTextColor(WHITE);
  display.setCursor(0,0);
  display.println("Filled Rectangle");
  display.fillRect(0, 15, 90, 45, SSD1306_WHITE);
  display.display();
  delay(2000);
  
}

void DrawRoundRectangle()
{
  display.clearDisplay();
  display.setTextSize(1);
  display.setTextColor(SSD1306_WHITE);
  display.setCursor(0,0);
  display.println("Round Rectangle");
  display.drawRoundRect(0, 15, 90, 45, 10, SSD1306_WHITE);
  display.display();
  delay(2000);
}

void DrawFilledRoundRectangle()
{
  display.clearDisplay();  
  display.setTextSize(1);
  display.setTextColor(SSD1306_WHITE);
  display.setCursor(0,0);
  display.println("Filled Round Rect");
  display.fillRoundRect(0, 15, 90, 45, 10, SSD1306_WHITE);
  display.display();
  delay(2000);
  
}

void DrawCircle()
{
  display.clearDisplay();
  display.setTextSize(1);
  display.setTextColor(SSD1306_WHITE);
  display.setCursor(0,0);
  display.println("Circle");
  display.drawCircle(30, 36, 25, SSD1306_WHITE);
  display.display();
  delay(2000);
}
void DrawFilledCircle()
{
  display.clearDisplay();
  display.setTextSize(1);
  display.setTextColor(SSD1306_WHITE);
  display.setCursor(0,0);
  display.println("Filled Circle");
  display.fillCircle(30, 36, 25, SSD1306_WHITE);
  display.display();
  delay(2000);
  
}

void DrawTriangle()
{
  display.clearDisplay();
  display.setTextSize(1);
  display.setTextColor(SSD1306_WHITE);
  display.setCursor(0,0);
  display.println("Triangle");
  display.drawTriangle(30, 15, 0, 60, 60, 60, SSD1306_WHITE);
  display.display();
  delay(2000);  
}

void DrawFilledTriangle()
{
  display.clearDisplay();
  display.setTextSize(1);
  display.setTextColor(SSD1306_WHITE);
  display.setCursor(0,0);
  display.println("Filled Triangle");
  display.fillTriangle(30, 15, 0, 60, 60, 60, SSD1306_WHITE);
  display.display();
  delay(2000);
}

Conclusion

This tutorial will show you how to interface the SPI OLED Module with the ESP32 DevKit board. This tutorial will show you how to connect the SSD1306 OLED Display with ESP32. You can also download libraries for Arduino IDE. Finally, you will learn the pinout for the SSD1306 OLED Display.

Related Stories

2 Comments

Leave A Reply

Please enter your comment!
Please enter your name here

Stay on op - Ge the daily news in your inbox