This article is all about Programming Raspberry Pi Pico with MicroPython for Beginners. From these Articles, you will learn different things about Programming Raspberry Pi Pico with MicroPython, for example, how to set Raspberry Pi Pico for installation of MicroPython and how it is Programed.
Soon we will write about Getting started with Raspberry Pi Pico. Which subtopics will be based on the RP2040 Microcontroller, Raspberry Pi Pico development board, and Pinout of Raspberry Pi Pico? So must read that out as well. (SOURCE)
Introduction
This Article is all about Raspberry Pi Pico Programming with MicroPython. So before moving ahead. First, let’s know what Python is.
Python is a program that is named after Monty Python. Here it’s not python snake, but it’s a Programing language that became popular among software developers since its launch in 1991.
Here is an exception: if you know about Programing language or you got your master’s degree in Computer programming language, then you would be able to learn about Python. Actually, in this article microphone is used for raspberry pi pico programming.
PYTHON INVENTION:
It was introduced for developing applications for electric devices such as desktops, laptops, and servers. These devices have strong hardware and powerful processor and use an OS.
Here is another question, Can small Microcontroller use a python embedded system for writing small applications?
The Anwer is yes, but the Python program does not give out its best output when used in Microcontroller boards like Arduino and Raspberry Pi Pico; they have strict restrictions in terms of memory and processing power and can’t run Python-like big desktops and laptops.
What is MicroPython?
The MicroPython was introduced by Damien P. George and was written in C language. It is a Python language interpreter invented for microcontrollers and embedded systems. MicroPython consists of 3 pieces Compatible, Compiler, and Run time. It is specifically designed to run on small Microcontrollers.
It consists of three Pythons subsets but doesn’t include all standards of Python libraries as it was developed for works on microcontrollers like big desktops. In MicroPython, a few Python libraries are added while the remaining are specially written for it, mostly for low-level hardware Access.
MICROPYTHON USES:
- If a software developer never has hardware but still wants to write libraries for Microcontroller embedded systems for personal or professional projects, then MicroPython should be used.
- The MicroPython working method is similar to that of Python. So if the software developer is familiar with Python working systems, controlling MicroPython will be easier.
- But if the software developer is working the first time, then don’t worry. It’s an easy language and can be easily learned. (SOURCE)
How is a Computer to use for Raspberry Pi Programming?
Before going forward, let’s know about” what is a computer? “
A Computer is an electronic device used to process and store data, typically in Binary form, and it performs the function given to it by the user.
RASPBERRY PI PICO DOCUMENTATION:
The computer host used for Raspberry Pi Pico documentation is Raspberry Pi SBC. It can be used for either MicroPython or C. While working on MicroPython, any computer such as Windows, Mac, or Linux can be used by installing or downloading IDE, known as Thonny.
We recommend you use a Linux-based computer. Like Raspberry Pi Computer, working with C makes downloading the SDK and writing C Programs easy.
We recommend you use Raspberry Pi for debugging code purposes as it will be helpful to use GPIO from Raspberry Pi for debugging Raspberry Pi Pico.
RECOMMENDATION: We recommend you use a Linux-based computer. Like Raspberry Pi Computer, working with C makes downloading the SDK and writing C Programs easy.
We recommend you use Raspberry Pi for debugging code purposes as it will be helpful to use GPIO from Raspberry Pi for debugging Raspberry Pi Pico.
Note: This article uses Windows systems to explain how Raspberry Pi Pico is Programmed with MicroPython. These steps can also be used on the OS system as well.
How to Install MicroPython on Raspberry Pi Pico?
Download MicroPython Binary
Let’s get started with programming Raspberry Pi Pico on MicroPython. (SOURCE)
STEPS:
- Download the Prebuilt Binary from the Official Raspberry Pi Pico’s Foundation or Website. This program makes it easy to run MicroPython on Raspberry Pi Pico and is the fastest way.
- Now visit the documentation page of Raspberry Pi and click On the “Getting Started MicroPython ” tab.
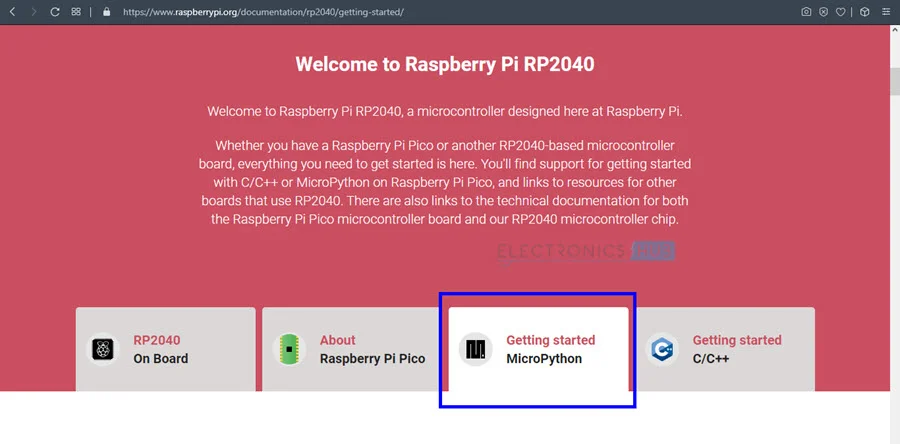
When the “Getting Started MicroPython” tab is clicked, All the text below the tab changes according to the chosen account.
Text related to Getting Started with MicroPython appears along with a few animated steps on “how to install MicroPython on Raspberry Pi Pico”?
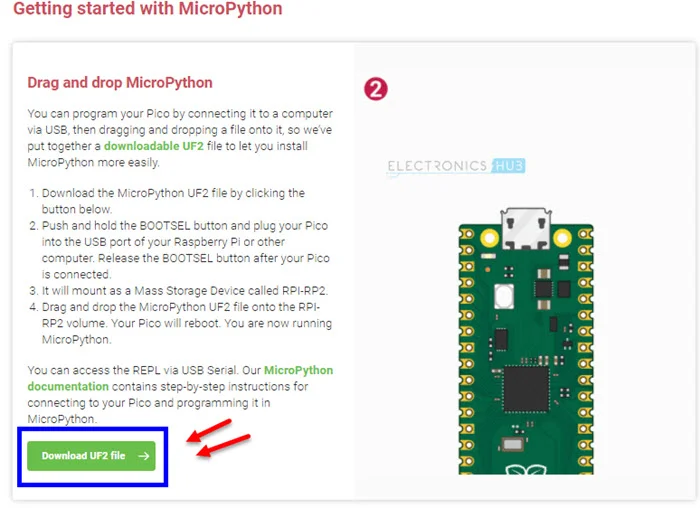
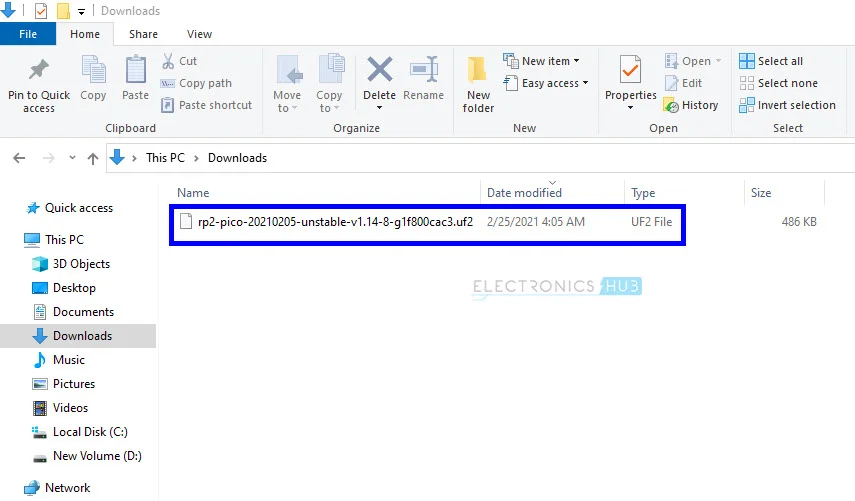
3: Go through all the important information and click the “Download UF2 file” option. A MicroPython Binary will start downloading in the form of a .uf2 file.
Note:
Soon the file will be quickly downloaded if the network connection is fast, so make sure to use a quick service; then, you will get files rapidly and without errors.
Install MicroPython on Raspberry Pi Pico
When the file is downloaded, upload it to the “firmware” in the Raspberry Pi Pico. For uploading purposes, follow the steps:
STEPS:
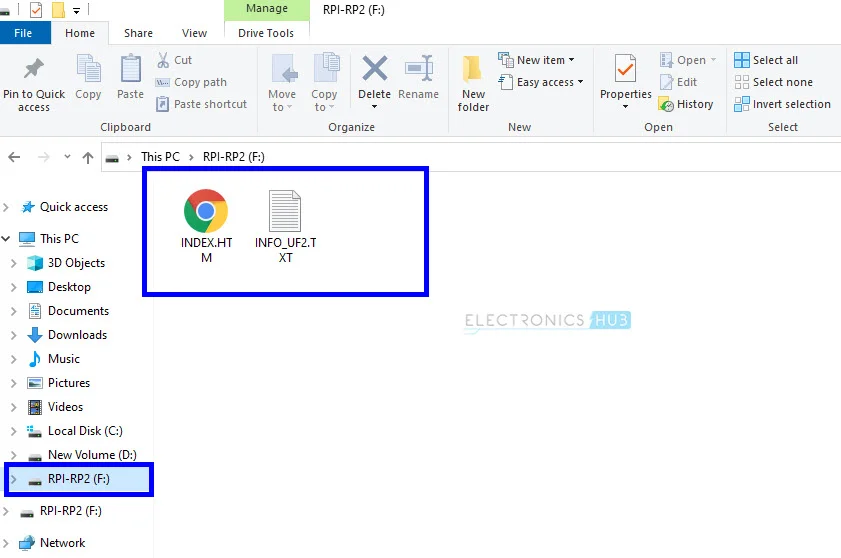
- First of all, convert Pico into Bootloader mode. For converting purposes, plug in a micro-USB cable to a micro-USB port of Raspberry Pi Pico. Then hold the BOOTSEL BUTTON on the Pico and attach the USB cable to the USB port in the host computer while holding the button.
- When Raspberry Pi Pico appears with “RPI-RP2 “, release the button after a few seconds.
- Now, After opening the file, you’ll see an HTML file.
4: Now drag and drop the downloaded MicroPython UF2 file into the downloaded folder on the RPI-RP2 device.
5: After transferring, the Raspberry Pi Pico will get restarted, and the mass storage device will disappear after copying the file.
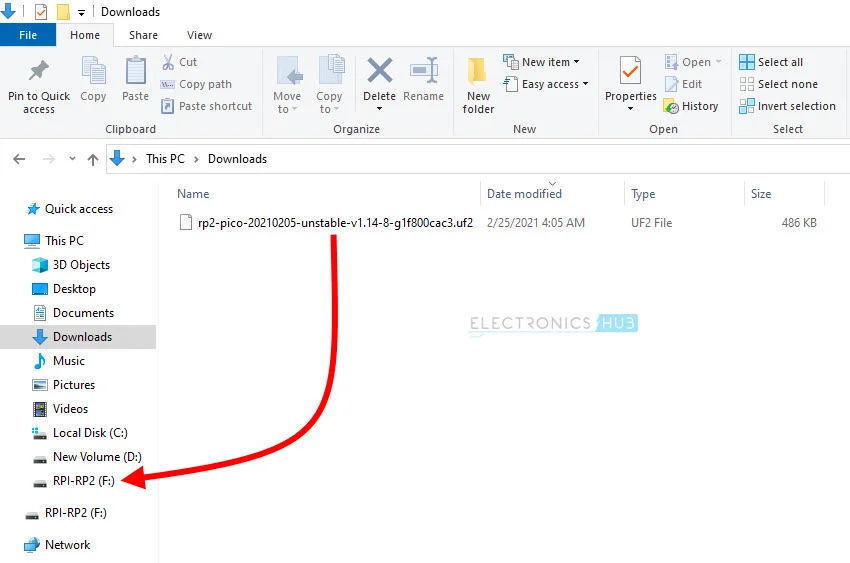
The Raspberry Pi Pico is ready to use MicroPython and to program Raspberry Pi Pico with MicroPython.
Downloading Thonny
If the host computer is based on Linux or Mac programming, then terminals and Minicom are used for communication purposes with Raspberry Pi Pico.
But in this Article, given below are the methods for programming Raspberry Pi Pico using Thonny IDE.
For better understanding, first, know about “what is Thonny “?
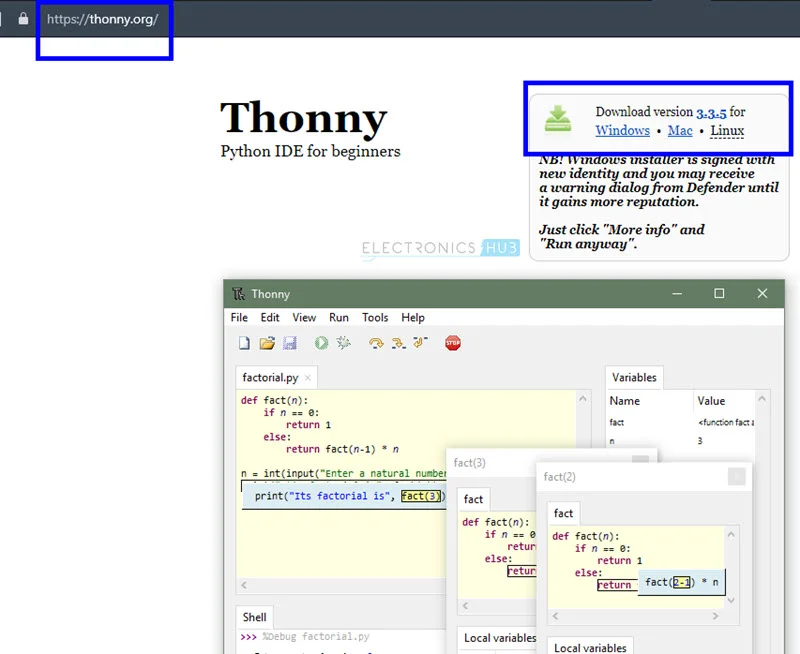
It’s a simple Python IDE program available for Windows, Mac, and Linux, but the Raspberry Pi OS comes with Thonny preinstalled.
While using Windows systems, versions of Thonny should be downloaded. “thonny-3.3.5.exe” is added; now, double-click on it, then it will start downloading, and Thonny will be installed.
NOTE:
Now you also know that nothing is difficult and nothing special is needed for installation as it’s a very straightforward process. If you want, you can also create a desktop shortcut by selecting and copying it.
Configuring Thonny for Raspberry Pi Programming
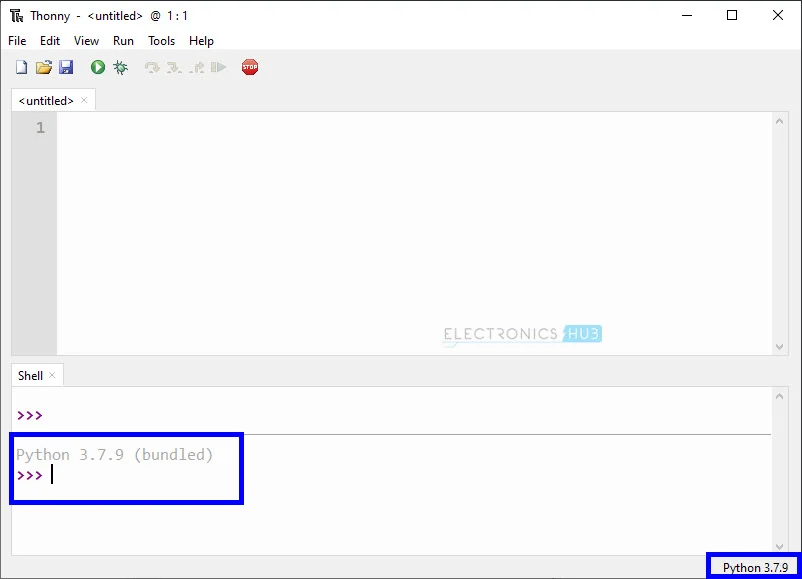
When the ThoThonny IDE has been installed, open it, and before it, ensure that Raspberry Pi Pico is attached to the host computer. Thonny is very simple, and its layout is divided into four parts;
1: Toolbar 2: Script Area 3: Shell 4: Interpreter.
All of them are shown in the below-given image:

- The Toolbar: Works to save, run, and stop the programs.
- The Script Area: It is for writing Python Programs.
- The Shell: It is an interactive REPL (Read-Evaluate-Print-Loop) block. It works when an individual command is given to the interpreters, and then they will execute them.
- The Interpreter: It selects the right interpreter from the IDE on the bottom right side.
Thonny IDE is a desk designed to interpret Python 3.x.x. automatically.
Click on Python and select MicroPython (Raspberry Pi Pico) interpreter. When the MicroPython interpreter is selected, the Shell Changes to MicroPython at the bottom.
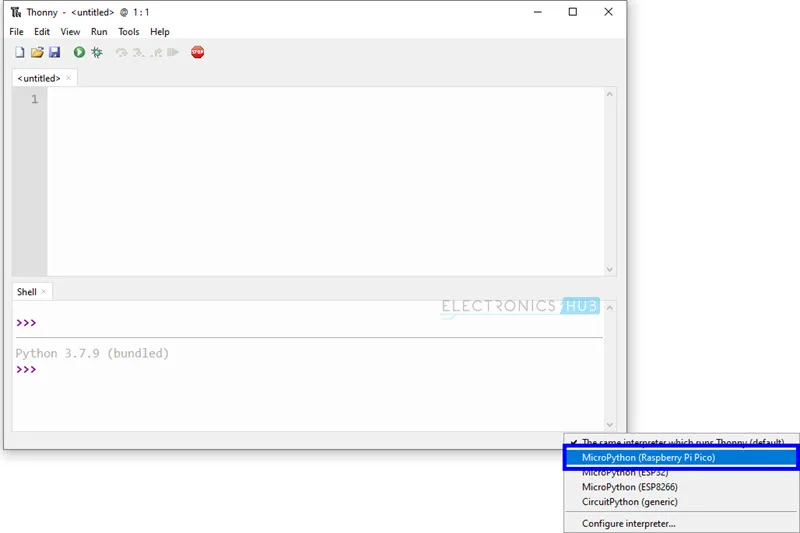
As the MicroPython supports REPL, now when the command is written in the Shell, the Raspberry Pi Pico will complete the order (source). The example is given below.
Programming Raspberry Pi Pico with MicroPython
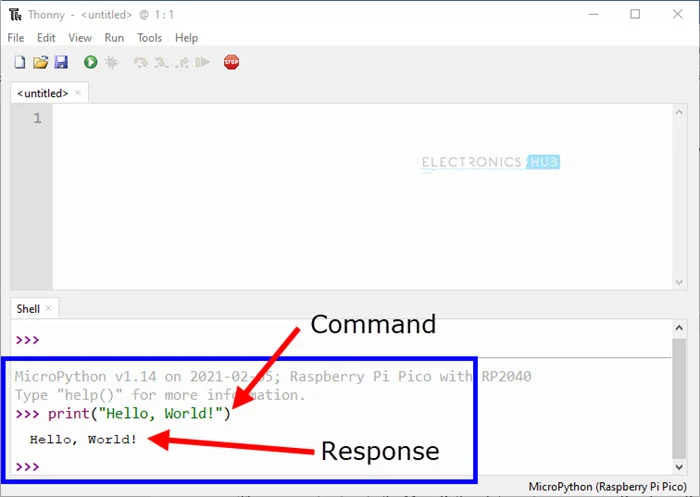
In the Shell, any command can be written with these“>>>” symbols. For example, writing “HELLO WORLD.”
print(“Hello, World!”)When the command is given in the Shell of a MicroPython interpreter whose working systems are based on Raspberry Pi Pico, when the order is received, the MicroPython will respond with a “Hello, World!” reply and automatically print it in its Shell.
If the layout of the Raspberry Pi Pico, an LED is attached to GPIO 25. Then this LED can be turned ON and OFF from the shell.

For trying to ON and OFF the LED light. For this purpose, a special library is first imported, known as a ” machine.” This library’s function is to control the hardware of the Raspberry Pi pico board. Also, when used on Microcontroller, the Machin module is reset, enabled or disabled, put to sleep, etc.
CLASSES OF MACHINE MODULE:
Some of the machine modules are given below:
- Pin Signal
- ADC
- UART
- SPI
- I2C
- RTC
- Timer
- WDT
- SD
- SD Card[/su_note]
All these are explained with their classes and functions and their usage. The MicroPython is the best choice for starting and exploring more about MicroPython Libraries.
IMPORTING PINS: To use the GPIO block, follow the following steps:
1: First, write a command “import the pin from the machine,” as this pin controls the IO pins of Raspberry Pi Pico.
from machine import Pin2: In the next step, provide details by creating an object from class Pin (led), and then the GPIO number is given with a direction like Input or Output.
led_gpio25 = Pin(25, Pin.OUT)3: LED is used as an object from the class pin, so now, for turning ON, manage its value properly.
led_gpio25.value(1)4: Now, After Typing the given line carefully in the shell. The LED will turn ON. Now for turning OFF, bring the pin’s value to 0.
led_gpio25.value(0)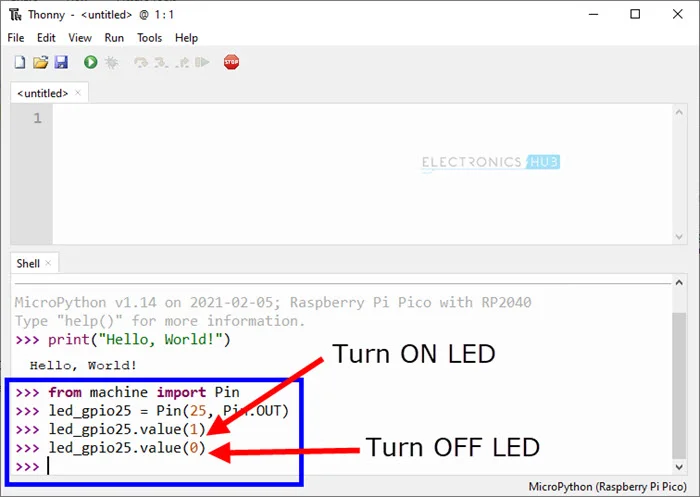

Blink an LED in Raspberry Pi Programming
The interpretation shell is the best for commands, but here a question arises: what to do to write a complete Python Program?
The answer is for such purposes, and there is a “Script Area.” Now, let’s move forward toward the process of writings a Python Program for Raspberry Pi Pico and Blink an LED.
STEPS :
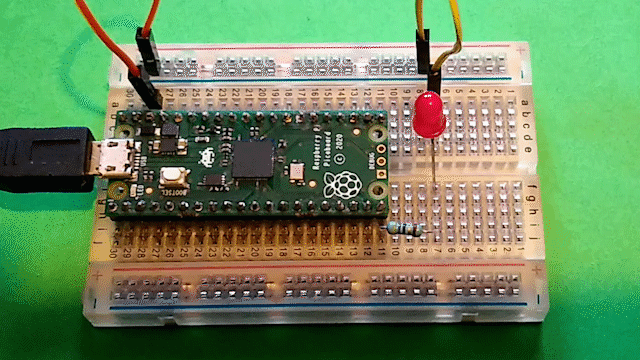
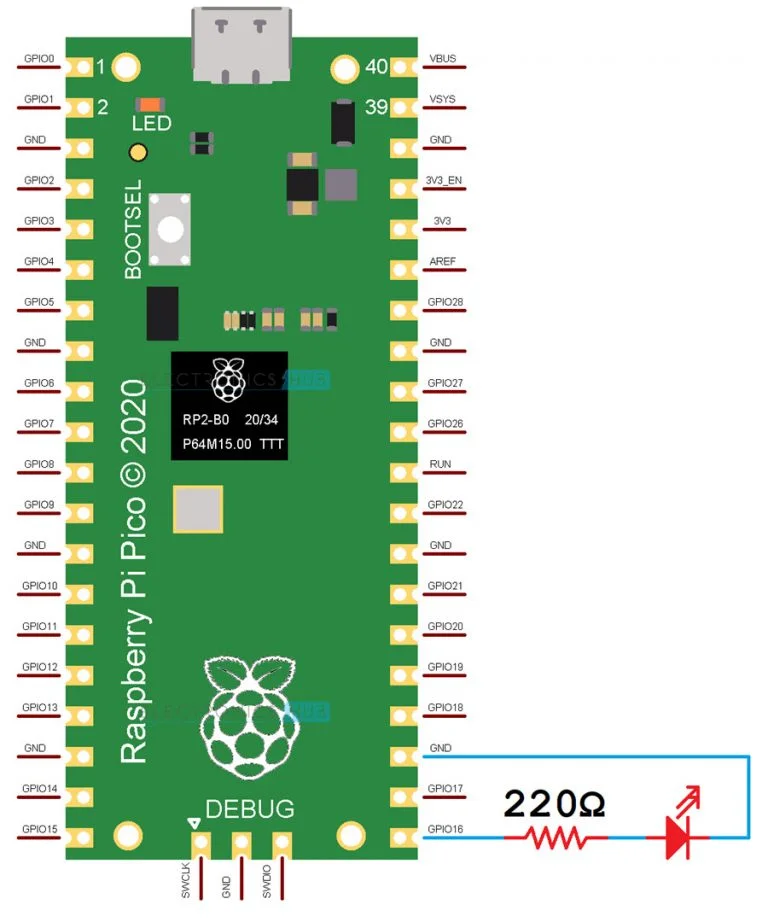
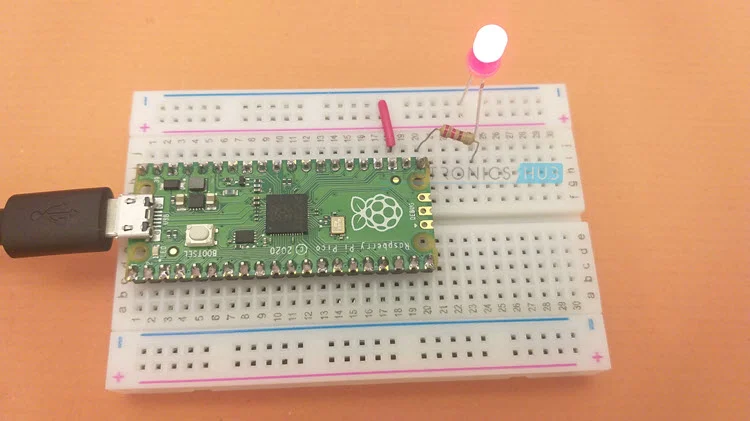
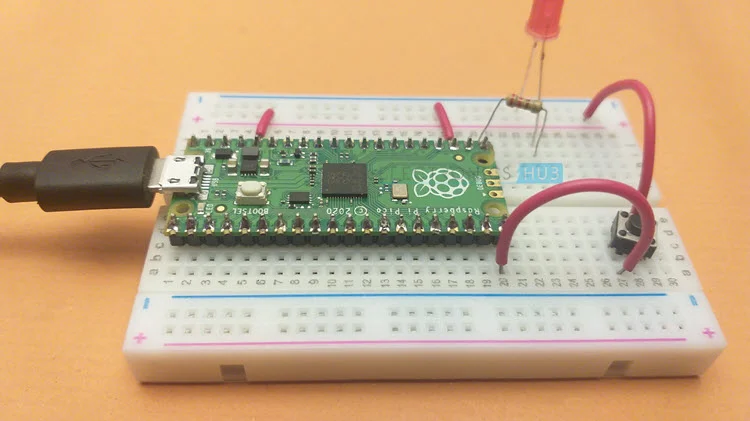
1: First, with the use or help of a 220Ω current controlling resistor, attach a 5mm red LED to GPIO 16 of Raspberry Pi pico.
In the second step, copy or type the given code.
#Import Pin class from machine library to configure GPIO Pins.
from machine import Pin
#Import utime library to implement delay
import utime
#create an object of Pin class and set GPIO Parameters (GPIO Pin, Direction).
led_gpio16 = Pin(16, Pin.OUT)
#Create an infinite loop. This is similar to while(1) in C.
while True:
    #Set value to 1 to turn ON LED.
    led_gpio16.value(1)
    #sleep_ms function provides delay in milliseconds.
    utime.sleep_ms(100)
    #Set value to 0 to turn OFF LED.
    led_gpio16.value(0)
    #Provide another 100ms delay to see the LED Blinking.
    utime.sleep_ms(100)
Raspberry-Pi-Pico-Demo.py hosted with by GitHub
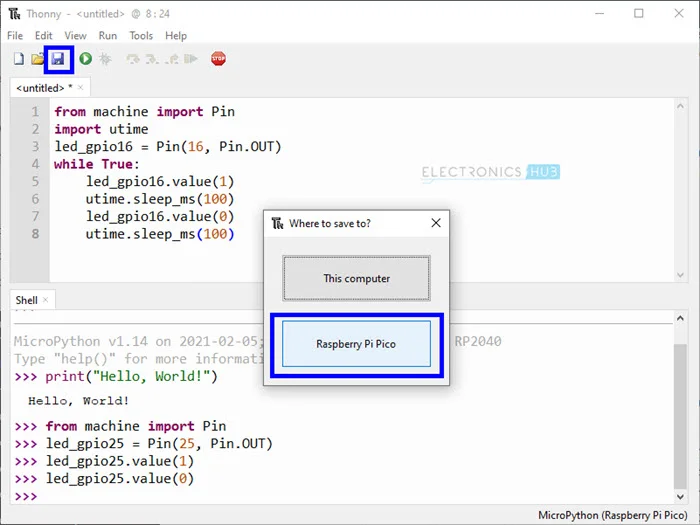
3: Now save it by clicking Save Button and choosing Raspberry Pi Pico when a notification appears.
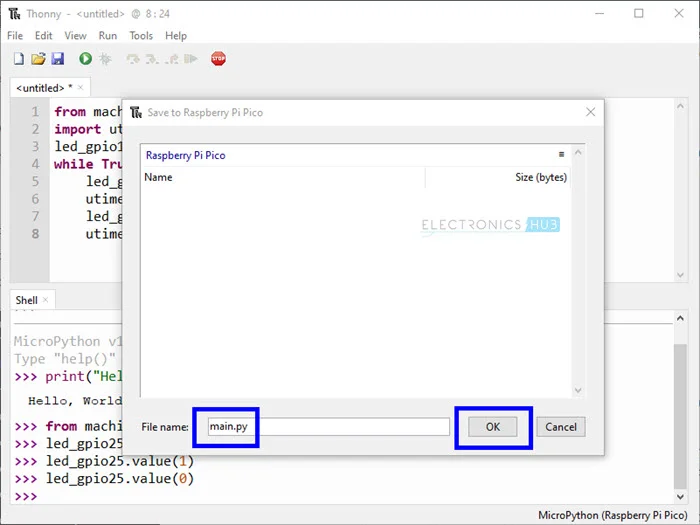
4: Name the file and click OK or done. We had named it “main.py.”
5: Now Click the ‘Run’ button, and then you can see LED Blinking.

6: There is another option for code reducing. Instead of setting values as 1 and 0, use toggled value.
#Import Pin class from machine library to configure GPIO Pins.
from machine import Pin
#Import utime library to implement delay
import utime
#create an object of Pin class and set GPIO Parameters (GPIO Pin, Direction).
led_gpio25 = Pin(25, Pin.OUT)
#Create an infinite loop. This is similar to while(1) in C.
while True:
    #Toggle the status of LED.
    led_gpio25.toggle()
    #sleep_ms function provides delay in milliseconds.
    utime.sleep_ms(100)
Raspberry-Pi-Pico-LED-Blink.py hosted with by GitHub
Reason for Naming main.py in Raspberry Pi Programming
Here a question arises what is the main.py name purpose?
The answer is that when the Python script is named main.py, you can reset, restart, and shut down the Raspberry Pi Pico easily, just as Microcontroller is Programmed to perform these actions when needed.
- Python programs can be given any name when “blinky.py” is presented. It will not be interpreted if the power is removed and then reconnected. You have to name the file or script “main.py” for these reasons.
- The Python script will only be interpreted when named ‘ main.py. ‘ If there are Multiple Python scripts, then only scripts with mentioned names will be executed by MicroPython.
Note: We are not experts; we are still learning about it. The naming process is written based on experience.
Read from Button
Some topics, such as setting Raspberry Pi Pico’s GPIO Pin, are explained above by setting putting GPIO pin as Output and Blink as LED.
Let’s explain this topic in a little bit of detail for better understanding.
At first, for Input purposes, set the GPIO Pin and then attach a button to it. Then examine the status of the button and then check the state of the LED.
CODE:
#Import Pin class from machine library to configure GPIO Pins.
from machine import Pin
#Import utime library to implement delay
import utime
#create an object of Pin class and set GPIO Parameters (GPIO Pin, Direction).
ledPin = Pin(16, Pin.OUT)
buttonPin = Pin(15, Pin.IN, Pin.PULL_DOWN)
#Create an infinite loop. This is similar to while(1) in C.
while True:
    if buttonPin.value() == 1:
        utime.sleep_ms(20)
        ledPin.toggle()
view raw Raspberry-Pi-Pico-Read-Button.py by GitHub
Input pin GPIO 15 is used for explanation purposes, and a simple push-button is attached. The other terminals of the button are attached to 3.3V. For exact and clear values, use the PULLDOWN option in the button.
In a normal state, PICO shows a LOW value on the button pin, but when the button is pressed, the PICO value increases, and now it shows a HIGH value.
Conclusion
This article is based on a detailed explanation of Programming Raspberry Pi Pico with MicroPython.
After reading it, you will be able to understand important topics related to Raspberry Pi Pico as there are sub-topics such as installation of MicroPython, Thonny IDE, Blink an LED, and the Importance of the reading button.
FEEDBACK:
If you have any problem, contact us without any hesitation by commenting and also give us feedback about our article.