Apple has recently activated the temperature and humidity sensors in its HomePod mini and HomePod 2 intelligent speakers with a software update to 16.3. This new feature allows users to monitor the temperature and humidity levels in the rooms where their HomePod devices are placed. This information can automate various tasks, such as turning on a smart plug that controls a heater or humidifier or even turning on the furnace or air conditioning.
How to Set Up and Use the HomePod Temperature and Humidity Sensors
Setting up and using the HomePod temperature and humidity sensors is straightforward. To take advantage of this feature, you must ensure that your HomePod device and iPhone are running the latest software. Here’s a step-by-step guide on how to set up and use the HomePod temperature and humidity sensors:
- Check your software version: Before you begin, ensure that your HomePod device is running software 16.3 and your iPhone is running iOS 16.3. If your HomePod device is not running the latest software, you can easily update it by heading to the Home app > your HomePod > swiping down to the gear icon > looking for the available update at the top.
- Open the Home app: Once you’ve confirmed that your HomePod and iPhone are running the latest software, open the Home app on your iPhone.
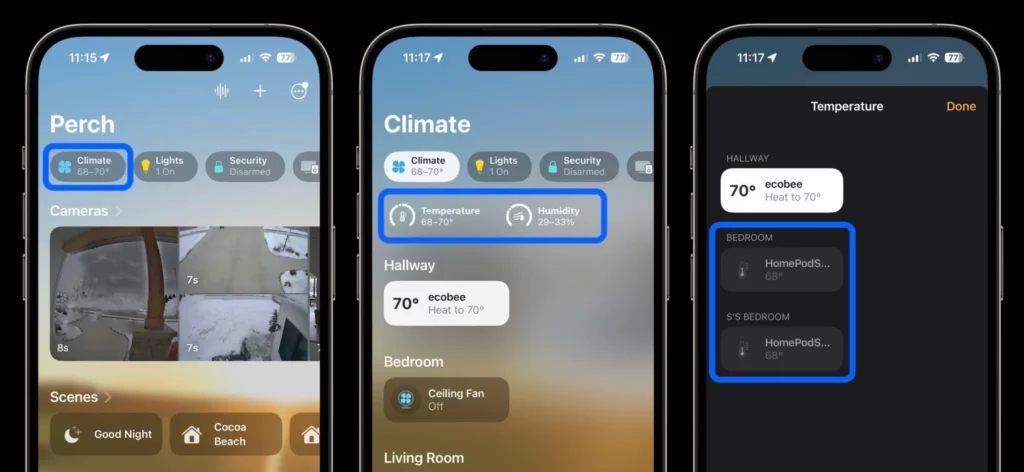
- Tap on “Climate”: At the top of the Home app, you’ll see a “Climate” tab. Tap on it to access the temperature and humidity data from your HomePod devices.
- View temperature and humidity range: In the “Climate” section, you’ll see a temperature and humidity range for each device reporting data. This could include your HomePod mini, HomePod 2, or any other HomeKit-enabled thermostats you have in your home.
- Tap on a HomePod device: To see more details on the temperature and humidity data from a specific HomePod device, tap on it. You’ll then see live data for that device.
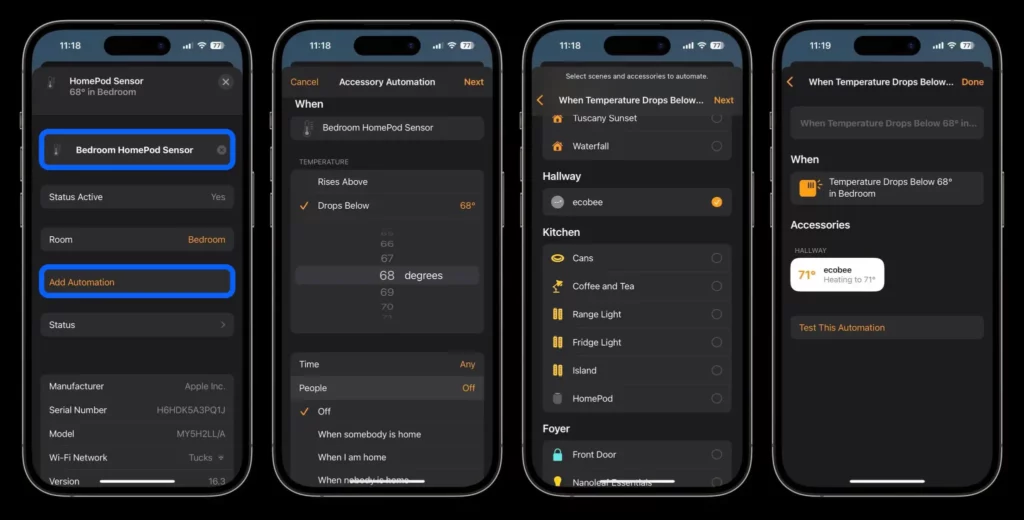
- Create automation: If you want to create automation based on the temperature and humidity readings from your HomePod device, tap on “Temp” or “Humidity” and then tap “Add Automation.” This will allow you to set up actions that trigger based on the temperature or humidity readings. For example, you could turn on your furnace or air conditioning system or control a smart plug that operates a heater or humidifier.
By following these simple steps, you’ll be able to quickly set up and use the temperature and humidity sensors in your HomePod devices. Whether you want to monitor the climate in different rooms of your home or automate specific systems based on temperature and humidity readings, the HomePod temperature and humidity sensors are a convenient and helpful tool.
Create Automation with HomePod Temperature and Humidity Sensors
To create automation using the HomePod temperature and humidity sensors, follow these steps:
- Open the Home app on your iPhone.
- Tap on the “Climate” option at the app’s top to see a temperature and humidity range for each device reporting data.
- Select one of your HomePod devices to see more details and live data.
- Tap on “Temp” or “Humidity” to create an automation.
- Rename the HomePod temperature/humidity sensor to your desired name.
- Customize the settings of your automation, such as if it should appear in your Home Summary or not.
- Once you have configured all the settings, tap “Add Automation.”
- Your automation will now be active and respond to the temperature and humidity readings from your HomePod device.
- You can set up multiple automation for different scenarios, such as turning on a heater when the temperature drops below a certain level or turning on a humidifier when the humidity drops below a specific group.
- With this feature, you can now have more control over your home environment, making it more comfortable for you and your family.
Alternative HomeKit Temperature and Humidity Sensors
For those who don’t have a HomePod device but still want to monitor temperature and humidity levels in their home, there are several options available. These options provide the ability to keep track of temperature and humidity levels, even if you don’t have a HomePod device. Here are a few options:
- Eve Room with Thread: This device costs $99 and provides temperature, humidity, and VOC concentration sensors. The device is compatible with Apple’s HomeKit technology and can be easily set up and monitored through the Home app.
- ONVIS Smart Sensor: This affordable option at $26 provides temperature and humidity sensors as well as a motion sensor. The device is compatible with HomeKit technology, allowing for easy setup and monitoring in the Home app.
- Philips Hue Motion Sensor: This device is priced at $40 and comes with a temperature sensor that can be monitored in the Home app. It is also compatible with HomeKit technology, making it easy to use and monitor.
- Eco bee HomeKit Thermostat: If you already have a compatible eco bee HomeKit thermostat, you can add temperature and motion monitoring with their wireless sensors, priced at $79. This will provide you with even more insights into the temperature and humidity levels in your home.
Overall, these options provide a cost-effective way to monitor temperature and humidity levels in your home without the need for a HomePod device. With a little research, you’re sure to find the perfect solution for your needs.
In conclusion
Apple has recently activated the temperature and humidity sensors in its HomePod mini and HomePod 2 speakers with a software update to 16.3. This allows users to monitor the temperature and humidity levels in the rooms where their HomePod devices are placed. Setting up and using these sensors is straightforward and can be done through the Home app on an iPhone.
Suppose you don’t have a HomePod device. In that case, several alternative options are available that provide temperature and humidity monitoring, such as the Eve Room with Thread, ONVIS Smart Sensor, Philips Hue Motion Sensor, and Eco bee HomeKit Thermostat. With these sensors, you can have more control over your home environment and make it more comfortable for you and your family.